
.jpg)
This article was added to on November 15, 2010
My work in HDR is not theoretical but actual hands-on testing of the kinds of scenes we experience every day. I’ve tested hundreds of scenes from landscape to cityscape to architectural. I’ve shot HDR during all times of the day and analyzed many approaches to HDR and all the programs for HDR. I’ve bracketed narrow image sets (1/2EV), broad image sets (3EV), merged too many images and to few images. I’ve compared ISO 100 with ISO 800 and analyzed single image tone mapping with the HDR equivalent. I even developed a method for using flash with HDR, called Flash Merging. This article is just a small part of some of my studies. For more information on my HDR techniques read my book coming out in May 08 called, “Complete Guide to High Dynamic Range Digital Photography” by Lark Books.
THE WORKHORSE OF BRACKETING
The easiest way to jump into HDR Photography is begin by setting the camera up to shoot in AEB mode with either 3 images at 2EV spacing or 5 images at 1EV spacing. The type of camera you have will determine which image set you are able to shoot, but either set will capture about a 10EV dynamic range. It is very hard to see a difference between the 2EV and 1EV spacing so don’t fight what you camera was built for. I refer to this bracketing sequence as the Workhorse Set because it is used for the majority of HDR photography and will capture the full dynamic range for most scenes.
WHY AEB? Auto Exposure Bracketing allows you to take all the images without touching the camera between exposures, provided the camera is on a tripod and a cable release is used. Handling the camera between exposures can increase the chance of mis-alignment resulting in an image that is not sharp or has ghosting. If you shoot HDR handheld image sets then AEB mode AND Continuous Shooting mode is a must. Trying to fumble with the dials between exposures doesn’t work.
NOTE: Thoughout this tutorial it is assumed that the dynamic range of the digital sensor is 6EV for a single image. This estimate is arguably low but I’d rather border on the side of quality. Several tests are on the web that indicate the sensor is able to capture much more than 6EV but noise begins to diminish the quality.
Taking 3 images @ 2EV spacing will capture a 10EV dynamic range and can be done in AEB mode with the following cameras.
Canon (1D Mark II, III, 5D, 30D, Xti, XT, Power Shot G7, S3 IS, TX1)
Nikon D80, D70, D50
Pentax K10D, K100D, K110D
Fuji FinePix S3

Taking 5 images @ 1EV spacing will also capture a 10EV dynamic range and can be done in AEB mode with the following cameras.
Nikon D2X, D2Xs, D2H, D200
Fuji Fine Pix S5

There are several cameras on the market that won’t allow a 2EV spacing in AEB mode so you will have to resort to manual bracketing.
Fuji S9000, S9500, S9600, S6000fd, 6500fd (3 images @ 1EV spacing)
Olympus E-1, E-330, E-500, E-410, E-510 (3 images @ 1EV spacing)
Sony A100H (3 images @ .7EV spacing)
Nikon D40 – No AEB Can you believe it!
Unfortunately, cameras that capture 3 images @ 2EV spacing are not able to dial in additional images while in AEB mode. 5 images @ 2EV spacing in AEB mode would be an ideal firmware update that hopefully all camera mfg’s will recognize. Until then, you will need to switch to Manual mode and just dial in a new setting after each exposure or use the second option and shoot TWO AEB sets combined with exposure compensation. In manual mode, be sure to become familiar with the number of dial clicks per stop because the tick marks in the LCD won’t show 4 stops.
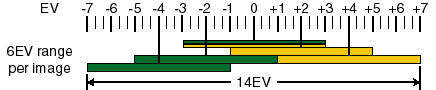
TWO AEB sets are fairly simple, your camera has a feature called Exposure Compensation that you can dial in before the AEB set is shot. First dial exposure compensation to –2EV, shoot 3 images @ 2EV spacing then dial exposure to +2 and complete the second AEB set of 3 images at 2EV spacing. When you are done, the set will include two 0EV images so one can be deleted, thus the final image set consists of 5 images @ 2EV spacing.
5 images @ 2EV spacing is from two image sets shown in yellow and green. The total capture is 14EV.
For capturing greater dynamic range with the high-end Nikons and Fuji S5 simply use AEB and dial in 7 or 9 images at 1EV spacing. The example below shows 7 images @ 1EV spacing for a total capture of 12EV.

SCENE CONTRAST
Scene contrast is the most important factor when deciding the number of images and bracket amount that you should use.
If you prefer single image tone mapping rather than taking an HDR image set, that’s fine, ghosting and alignment is no longer an issue, but understand it only works to a point. Eventually the contrast will become great enough that noise will dominate the shadows and the highlights will be blown. In addition, an important realization is that even 3 images @ 2EV spacing starts to fail when the contrast gets high enough. You may need to shoot 5 images @ 2EV spacing or more, to adequately capture the full dynamic range of the scene.
DIRECTION OF LIGHT
If you are starting out in HDR photography, use the direction of sunlight to help you identify scene contrast. In the field, I used a Sekonic spot meter to determine EV range and I began to categorize scenes with similar dynamic ranges. These categories are based on the direction of light relative to the camera and the presence of small regions of brightness or darkness in the scene. These categories allow me to determine in the field what kind of dynamic range I’m trying to capture and how much bracketing I need to do.
Category 1 – FRONT LIT, OVERCAST, DAWN or DUSK
Front-lit scene – the sun is behind you and the composed scene is fully lit with little to no shadows.
Overcast light – cloud cover is significant and shadows are faint and non-existent.
Dawn and Dusk – for a period before sunrise or after sunset. Scenes that do not include the rising or setting sun are bathed in diffused light.
BRACKETING: Single image or the Workhorse image set
Category 2 – SIDE LIT, TOP LIT
Side-lit or top-lit scenes – sunny day with the light approaching from the right, left or above. Shadows are common.
BRACKETING: The Workhorse image set
Category 3 – BACK LIT, NIGHT SCENES, INTERIORS
Back-lit scenes during sunrise and sunset – this scene occurs when you point your camera toward the sun and objects are in the foreground. Shadows can be pronounced and light very bright.
Night scenes with streetlights
Interior with window(s) to outside
BRACKETING: 5 images @ 2EV spacing, 7/9 images @ 1EV spacing
The chart below shows the change in dynamic range from 3 – 15EV. It also shows the typical images that fall in each range and the technique you can use to capture an image in the range. The dashed lines in the two techniques indicate that capture is possible but not always successful.
SMALL REGIONS OF DARKNESS – CAVE EFFECT
In addition to the direction of light, it is also important to recognize that small regions of darkness can cause any scene in any category to have much higher dynamic range. If you want to capture details inside those small regions then you will need to bracket for a greater dynamic range even if the scene is in category 1. I say “small” regions as it relates to the % of the scene in the viewfinder, not the absolute size of the region.
Visualize a hillside with a cave in the face. The deeper the cave, the darker it becomes and the greater the dynamic range between the sunny hillside and the dark cave. I call this the cave effect and it plays a significant role in the dynamic range of the scene.
Learn to identify the cave effect in your composed scene. It is all around us in varying amounts. It could be a fruit stand, I-beams under a bridge, breeze-way where people walk, a garage, under a car, a dense region of trees, even books in a book case.
In this image, it’s very overcast and the light is diffused, the snow causes even more dispersion of the light and it’s clearly a category 1 scene. Normally I would take 5 images @ 1EV spacing but notice in the distance there is a tractor in the garage. I recognized the cave effect and knew that if I wanted details of the tractor a single image or even 5 images @ 1EV spacing would not work. In this scene I took 7 images at 1EV spacing and captured details of the tractor.
![]()
BLOOMING – Regions of darkness are susceptible to blooming when longer shutter speeds are needed for proper exposure. Pixels surrounding the dark area become so saturated they begin to spill photons into the dark area. The result is a hazy look to the dark area that can appear in the final HDR image. As an example, in this image, if I had tried to expose for the opening in the top of the barn (near center) blooming would have made it impossible to see the details inside the barn.
SMALL REGIONS OF BRIGHTNESS
Put a 100watt light bulb in a 10’ x 10’ empty room and the dynamic range is 12EV. The source of light is bright and it drops off very quickly to the corners of the room. Similar to the light bulb in the room, night scenes with artificial light can create very high dynamic ranges. Remember artificial light drops off quickly and if another light is not nearby to “fill-in” then the dynamic range increases. When the situation arises plan on adding additional exposures. I usually shoot 7 images @ 1EV spacing.
Night photography – Streetlights are small regions of extreme brightness and if the scene has dark shadows then you can expect a high contrast scene. This HDR image of Boston is from 7 images @ 1EV spacing.
Interior architecture – When the scene includes a window with an outdoor view the dynamic range can easily exceed 10EV. This HDR image is from 7 images @ 1EV spacing plus an additional image at -4EV to capture highlights. This example has lots of windows, when the window is small the contrast will be even greater.
Sunrise or sunset photography that includes the sun can be very high contrast. The foreground is back lit and dark shadows are often the case. This HDR image was taken in Acadia National Park, Maine and is from 7 images @ 1EV spacing (left).
As a side note, here is a comparison between HDR and the use of Graduated Neutral Density Filters. The left image is HDR the right image was taken with Graduated Neutral Density filters. I stacked a 2 Hard and a 3 soft and shot a single image. Notice that it doesn’t match the HDR image in detail enhancements and the reflection across the water is pretty blown out. Also, the flare, which has been an issue with me for years, appears across the distant rocks.
This is a case of extreme dynamic range and shows the amazing ability of HDR photography. It’s so dark I can’t see my feet and the light is so bright at the opening I can’t recognize any detail near the tunnel opening. It was similar to being in a dark room with someone shining a flashlight in my eyes. It consists of 7 images @ 2EV spacing and captures a range from -6EV to +6EV. The HDR image is noise-free and it captures the highlights in the sky and the detail of the bricks in the sidewall of the tunnel. Had a train come during the shoot, my plan was to run to the little fake door on the left and wait it out, good thing it didn’t.
What happens if I don’t capture enough dynamic range? Capturing the full dynamic range is important especially when you put in lots of effort to get to the scene. It’s easier to capture more images than you need than to go back and reshoot, besides you can look at the histograms and delete the unneeded images later.
This is 3 images @ 2EV spacing and it doesn’t capture the full dynamic range and the result is noise in the dark areas, lack of detail, and blown highlights. Kinda sounds like a single image shot, doesn’t it.
NOISE and HDR
Oh, those damn randomly-spaced, brightly-colored pixels, they are as bad as ants.
-
The single most important way to avoid noise in HDR is capture the full dynamic range.
-
If noise is a primary concern of yours then a smaller EV spacing is better. The many tests I’ve done show that 1EV spacing is better than 2EV when noise is an issue however, it doesn’t mean you have to shoot all image sets at 1EV. Just be aware of the technique and apply it when noise is possible, ie. dimly lit, long shutter speeds, high contrast.
-
It’s fine to use noise reduction software before merging to HDR but if you’ve captured the full dynamic range it’s not necessary.
-
I prefer to shoot RAW image sets but on many occasions I shoot RAW +JPEG and compare the two HDR images. Once processed in HDR, it is very hard to impossible to notice a lower quality in the JPEG.
-
The software used to merge-to-HDR can make a difference in noise control. NOISE WILL ALWAYS BE IN THE BRACKETED IMAGES, there is no way to avoid it in the underexposed images. It’s up to the merge-to-HDR algorithm to avoid inclusion of the noise. The best software for noise control is Photomatix, FDRTools and EasyHDR. Other merging software such as Artizen, Photoshop CS2/3, don’t do as well. If you decide to give FDRTools a go, you’ll find that it is exceptional in noise control.
-
Regardless of the software it all goes back to the first point, you have to give it good data. Let’s take a look at the darkest region in your image set, like the top right corner of the tunnel shot. The algorithm looks at each pixel in the stack and all of them are black but hey it comes across some blue and red ones in the underexposed image and decides these are good to bring along in the final image. But if you give it data that have values above 0 in the overexposed images it will choose that over the noise. The only way you can do that is take a more overexposed image.
ADDITIONAL CONSIDERATIONS ABOUT CONTRAST
-
Reflective surfaces have to be treated as a light source. A reflection of the sun or other light sources will dramatically increase the contrast. Small reflections can be ignored but large reflections need to be considered.
-
A dimly lit scene is not necessarily high contrast particularly if source lights are not included in the composition.
-
A brightly lit scene can be low contrast. A picture of the clouds, although very bright, is low contrast as long as the sun is not included.
-
Don’t try to expose for the sun’s disc. Allowing the sun and a region around the sun to be blown is acceptable in photography.
SINGLE IMAGE TONE MAPPING VS. HDR
Scenes that fall into category 1 have a dynamic range that can often be captured in a single image. As a simple example; if I photograph a flat gray card, there is no shadow or highlight detail missed by the single exposure and an HDR image is not the best technique. Now put some bends and folds in the gray card and allow the source light to approach at a low angle. The dynamic range increases and eventually a single image fails to capture enough dynamic range and HDR techniques are preferred.
![]()
Above is the single image RAW file. The scene is front lit and overcast. Shadows are not pronounced in the area under the canopy but there is a slight cave effect. Notice the histogram shows that clipping has not occurred, thus single image tone mapping could be the best alternative. However, realize the tails of the histogram can have less than optimum data, noise or color shifts can be present.
Below is the single image tone mapped in Photomatix with default settings and below that is the HDR image created from 5 images @ 1EV setting. Don’t be concerned with the different color saturation or slightly different levels of contrast. These are easily adjusted in post processing.
![]()
Single RAW Image Tone Mapped (0EV)
![]()
HDR image from 5 images at 1EV spacing
The 100% crop below shows the single image (left) and HDR image (right). They are difficult to distinguish because the cropped area is front lit and there is no cave effect.
![]()
Now let’s look at a different crop, an area where the cave effect comes into play. It’s clear that the HDR (right) shows less noise than the single image (left) in the shadows under the canopy. So now it’s up to you, do you prefer a single image with slightly more noise, that is free of ghost or alignment issues or the HDR image which is nearly noise free. The call is subject and for this example I prefer the single image because the noise it carries is not significant and the HDR shows some ghosting in the distant part of the street.
![]()
Single image tone mapping can produce high quality images; analyzing the scene and even composing the scene for it’s single image potential is a good approach to better photography. It may require moving a distance to your right or left but getting the scene to be front-lit for example, can make all the difference.
ADDITIONAL CONSIDERATIONS ABOUT BRACKETING
Don’t bracket less than 1EV. Here is .7EV bracketing and it’s pretty clear that image overlap is excessive and it takes more images to capture the full DR. It’s a fallacy to shoot a large image set, say 12 images at 1/2EV, and conclude that all image sets should be this size because you got good results. The reality is that equal or better results can be obtained with fewer images at a greater EV spacing if the dynamic range is covered in both cases.
Consider two images +2EV and –2EV. I call this the Bi-Polar image set. Overlap is sufficient, range is ample and it’s the preferred method when being chased by a bad guy. One nice benefit is that fewer images need to be processed, archived and tracked for the rest of your life.
How far can you push this? I’ve found that merging +3EV and -3EV causes some blending artifacts so I avoid going that far.
Consider shooting the Workhorse Set plus one image
Shooting 3 images @ 2EV spacing is sufficient for most scenes but in certain situations a fourth image is needed. Let’s take a scene with the horizon line in the upper third of the frame like the Grand Canyon shot below. In matrix or zone metering, the camera is going to expose for the dark shadows of the canyon, as they comprise the majority of the scene. The camera will bracket based on the shadow area and place less emphasis on the narrow bright area occupying the edge of the frame. Thus, the underexposed image (-2EV) may not be sufficiently under exposed for the bright sky. The best method is to add one image at –3EV or –4EV to give a margin of safety for capturing the full sky color.
The opposite also applies. If an important area of the scene is dark and you want detail that is noise free, then certainly take additional overexposed images.
This is the edge of the south rim of the Grand Canyon at sunrise taken with a 10.5mm fish eye lens. From the bottom of my feet to the river below it’s 1 mile down. The sun is rising on the right and you can even see where it’s lighting the top cliff on the left. By the way, there is no pic as awesome as standing before the canyon. Put it on your list of places to visit.
I hope you enjoyed the tutorial.
The images in this tutorial were made with Photomatix and FDRTools. FDRTools is the tunnel shot and the Grand Canyon above. Both are really excellent HDR programs. If you are interested in Photomatix you can get a discount by typing in “beforethecoffee” in the coupon box at the purchase page for Photomatix.
Happy shooting!
Ferrell,
Thanks again for a great tutorial. I think your explanations of how to effectively shoot and create HDR photographs will change many people’s photographic styles for the better. Seriously, this helps quite a lot.
It’s great to have a professional in the house!
The Sultan
WOW
I’m blown away by your tutorials….
I’m really lovin’ this, man!!
Congrats, and keep the information comgin!
A very interesting article, full of information and helpful advice, thankyou for posting it. Being new to HDR I will definitely be referring back to this time and time again.
Richard.
I am new to HDR and this has been most helpful, I have an Olympus C7070 and its AEB mode shifts the f-setting instead of shutter speed. What a bummer!
Wonderful, simply wonderful.
I fully agree with all previous comments!!
Thanks, this is extremely helpful information! One minor point, however: The Pentax K10D belongs in the list of cameras that can take 5 images @ 1EV spacing (it can also take 5 images @ up to 2EV spacing (I do love my K10D!).
This was an amazing HDR/bracketing tutorial. I’ve recently begun playing with HDR on my new D80 and was beginning to think the noise was a low-light problem and then I just wasn’t using a low/smooth enough ISO. But then I got it in a well-lit shot too. Now the concept of capturing the full dynamic range of the contrast visible makes a hell of a lot more sense. I also wasn’t sure how to get around the 3-expose limit on the D80’s auto-bracketing. I wondered if doing two or more sets and just adjusting the base ±EV setting was the key; now I know my suspicion was right. I just hadn’t had the chance to try it yet.
Thanks a ton!
-Ryan
very nice tutorial. i just ordered the pentax k10d and am really looking forward to doing some real hdr. your pics are killer, btw. and you are so right about having to see the grand canyon, that place kicks my ass. tim
What the hell?! I have never seen a more informative and awesome HDR tutorial. I have learned more by reading this in regards to improving my HDR than I have in the previous 6 months of arbitrary practice. And my friend told me 3 exposures at 2 stops apart would always be enough! Hmmph. Well, I can’t wait to get out and start this.
I can’t wait to get the 5 image set done for my next HDR.
I have been umming and arghing a bit about if I should get Photomatix or just keep on using the CS3 to do my HDR. So far I have better results with Photomatix. But I suspect that I could do as well with CS3 if I give it some more time.
Great information. I’ve been playing with HDR for a quite a while, but really learned a lot reading this. Thanks!
That’s a well written and a very comprehensive guide to EV stepping. I really appreciate your efforts in putting this together.
You are extremely talented. Keep up the great work.
cw
Found via Flickr – superb information, in a readable style. I worked out a way to get my 5-stop AEB function working for 8 stops, by means of giving 3 stops of Exposure Compensation either way before doing a 5-stop AEB on each. Gives me a total of 10 images, though two are duplicated. Now I need a heavy tripod!
Really good tutorial, thanks – gonna have to get started!
Thanks
My jewellery Photographs:
http://www.11thstudio.com
Thanks for a great tutorial. I have been shooting HDR for about 18 months and it has changed the whole way I shoot. It gives me what I see, instead of the standard narrow dynamics of traditional film. Really enjoyed the tutorial and will refer others to it.
Your tutorial was both educational and enjoyable. I found you via the HDR group on flickr when I was searching for information on the number of exposures to use for producing an HDR image.
Here’s what I was wondering: given the same scene, shooting exposures covering the same range, is it better to have more exposures? For instance, if a -2,0,+2 set covers the range of the scene adequately, does a -2,-1,0,+1,+2 set produce a different final result?
You say that smaller EV spacing produces images with less noise (especially with dim scenes and long shutter speeds). But then you say not to bracket at less than 1EV because the overlap is excessive.
So then, a bracketted set of five 0.7 EV shots would be less desirable than a set of three 1.0 EV shots, given that the inherent dynamic range of the scene could be covered by the set of three?
I was hoping that you could clarify this a bit.
Thanks!
Hi and thanks for dropping by. I shoot the D2X and routinely shoot -2,-1,0,+1,+2 image sets so it’s easy for me to test the second alternative by dropping the -1 and +1 images. Results are usually identical however, if the scene has lots of potential for noise 1EV spacing is better, without a doubt. My limited testing on the 0.7 EV spacing showed no improvement but from a purely theoretical viewpoint, the spacing is much closer than needed. Another really beneficial reason to shoot -2,-1,0,+1,+2 image sets comes when tone mapping results aren’t quite what you had hoped for. Now you have two valuable frames, the +1 and -1 for blending and/or single image tone mapping. Best to you and happy shooting, Ferrell
I really appreciate that people like yourself give us these tutorials on HDR. There isnt many options to learn that much on this style of imaging. So without you we would still be scratching our heads over images with limited tonal range.
One question I have is about post processing. I’ve been using Photomatix for several months and I struggle to get my images to look like alot of what I see here, and on flickr. I’ve only been shooting 3 images at 2ev(until reading this). Do most people do multiple tone mapped HDR’s for specific tones in an image and combine them in PS?
I see alot of beautiful images, but I wish I could get more of a detailed explanation on what went on in the background to get to that point. Could you give us some typical steps you take in PS?
Thanks
“Don’t bracket less than 1EV.”
I beg to disagree. I have found that night scenes with street lamps need less than 1EV steps (and a solid tripod!) to avoid artifacts in the lights.
Cheers,
Pedro
Hi Pedro,
When you seek proper exposure of the lamp itself the dynamic range of the scene soars to unbelievable heights. The light itself and the immediate area surrounding is very difficult for your digital sensor to gain control of when your shutter speeds are set for the night scene. At the lamp location, pixels are blown; photons spill over into adjoining pixels causing additional problems (blooming) and different wavelengths of light saturate at different times causing color shifts.
The street lamp itself is an environment of complete and utter photon chaos. I agree that smaller than 1EV increments could be needed for your digital sensor to gain control of this harsh digital environment; especially if it occupies a small area of an otherwise dark scene. However, I think you’ll find that viewers of your photography are accepting of blown pixels in the center of the street lamp.
As for the artifacts, the program used for your merging and tone mapping could be the reason. When it comes to merging to 32-bit image files the programs differ quite a bit, especially at the end where pixels are close to full saturation. The programs: Photomatix, FDRTools, Artizen, Dynamic PhotoHDR, EasyHDR, CS2, CS3 will give different merging results when the dynamic range is high. I’ve tested them all quite a bit on many scenes. Thank you for the comment and have a nice day!
Such great stuff Ferrell!!
I added a link to this on a Local Photo Art group site I am puting together – Ameliaislandart.org . I am a non exhibiting member (rookie and space limits) still a work in progress will present an overview to them next month.
This one and mine Adamsviews.com (for my metal obession and need for gas money) they are based on free services starting with Office Live – various free hosting for big link views (to maximize storage) and Backprint.com for ecommerce – I tried to blend it -;0)
John
Hi Ferrell,
Many thanks and congratulations for the great HDR tutorial.
It’s the most complete and extensive I’ve read so far.
I’m about to buy a new DSLR camera and I’m considering either Canon 400D or Nikon D80.
Looking at the specs canon has a +/-2 EV range while the Nikon +/-5 EV range, meaning I can get a wider range with Nikon.
Is my understanding correct?
Also it seems that it’s not possible to do the extended DR set using one the above Cameras to get 12 and 14 EV range.
Of course I’m not expecting you to know all spec for all cameras, but if you happen to know which of the above Cameras would be more suitable for HDR (is covering a wider rage an advantage by it’s own)
Any feedback would be appreciated.
Thanks so much again,
Vangelis
Hi Vangelis,
Be careful about confusing auto exposure bracketing (AEB) with exposure compensation. They are different functions: in AEB mode one press of the shutter can take all 3 images – a nice feature when shooting handheld or scenes that have some motion vs. exposure compensation (-5EV to +5EV) which requires you to take an image then touch the camera to dial in another exposure then release the shutter, then repeat till all exposures are taken. The Canon specs are most likely for AEB which give 3 images at 2EV spacing (-2, 0, +2), while the Nikon specs are exposure compensation specs that you dial in each time.
great hdr tutorial. I’ll give it a try asap and I hope I’ll have good results
i’ve bookmarked this page for future reference since i’m just a beginner in photography. i found your site while researching “bracketing” for class. perhaps when i’ve finished my digital photography class i’ll understand a little more about what you spoke of. i only wished you would have shown some more examples – because as a beginner it’s easier to see/understand the difference rather than to read about it. overall though, i will be exploring hdr when i become more comfortable with my camera. i have the oly e330, which does not support the 2 ev spacing in aeb; but i bought the camera b/c of the price, features, & discounts i can get on lenses/accessories in the future. thanks for the write-up!
Hello Ferrell,
I found your website some months ago. I would like to say how much I liked it. I am a photographer and I’ve started to learn about HDR technique. Your experiencie and tutorials is of very much help. The results you are showing are espectacular and very inspiring.
I own a Canon EOS 5D and I’ve already tried to apply HDR with Photomatix, but I still need practice. Also, it’s a pleasure to see a blog like yours, with BIG size pictures. They come alive much more than places like Blogger.com where images are showed like miniatures!
Another thing. I am trying to build my own Blog in WordPress, also with the same Theme as yours, but changing the CSS (colours, borders and so on), buying the “CSS enhance” option. Can I just ask you a design question? How do you make ALL the comments to appear already OPEN beneath the post? I am surprised, as in all themes the default option is just a clickable link (i.e. “15 comments”), when I’d like the comments to be shown as in yours. I’d appreciate any kind of help. Thank you. Congratulations for your beautiful work.
Marcos/Spain (Gallery – http://www.fotonatura.org/galerias/8842/).
[…] is a link to an excellent tutorial on exposure bracketing for HDR images. Photomatix [3:44m]: […]
[…] scenes that do not include the sun. Anyway here is a real detailed and informative link on HDR: Bracketing & Number of Images « Before the Coffee Have […]
this has been very helpful …
very nice …
thanks for sharing …
appreciated …
Hello again Ferrell,
Just a note to tell you I’ve inaugurated my blog (photography-related), in which I have written a short post about HDRI, recommending your wonderful web page about HDRI, as well as linking you.
http://marcosmolina.wordpress.com/2008/02/16/%e2%80%a2-la-tecnica-del-%c2%abhdri%c2%bb/
If you don’t agree linking you, please let me know (blog@marcosmolina.com) and I will erase you from the blog.
Many thanks again for you site, it’s a recurrent web to learn more & more…
Best wishes.
Marcos.
Brilliant, just the sort of info I have been looking for. Best regards Steve
Excellent article. Very eye-opening!
Cheers for sharing *thumbsup*
[…] http://beforethecoffee.wordpress.com/bracketing-number-of-images/ […]
On my Canon 1DM3 I can select AEB up to +-3 and thru custom functions can select the number of AEB shots up to 7 — so it kind of meets your request to be able to do 5 shots at 2EV…… that is if I understand what you are saying here….. thus I guess I would select 5 shots and 2EV for the best choice when shooting HDR…. is that right?
Hi, Ferrell!
Bill C. from b-ccc recommended your site to me and I’m so glad he did. You are very talented in your ability to inform in an easily understood style. Congratulations on your new HDR book–I’m sure it will do well if this tutorial is an example of what it contains.
Have I seen your HDR work in the b-ccc competitions?!
Thank you for taking the time to share your knowledge and experience with those of us who are struggling wannabes.
Beth
[…] Bracketing, Basic HDR information, Some Digital Photography and HDR tutorials […]
[…] camera. Look for Exposure, AEB (Automatic Exposure Bracketing), A-EV, BKT (more on that here and here), or a little +/- […]
It´s a great tutorial. Crystal clear explanations!
Thanks,
Bicefalus
Love the tutorial…this is exactly what I was looking for!
I’m looking at the Pentax K200D and I see this for the AEB in their brochure:
3 frames, ±1.5EV (0.5EV steps) or ±1.0EV (0.3EV steps)
If I read this right, and assuming that the sensor has a range of 6EV, the total range I can get out of this is only 9EV?!? What’s the point? (or, as we say around our software guys here, “it’s just software”)
Please tell me I’m wrong about this…it’s the perfect camera for me otherwise!
Thanks,
Bruce
Bookmark’d. Great tutorial filled with useful tips!
Thanks. Awesome article.
Great work
Thanks,
Wayne
[…] – HDR Kurzversion HDR (tags: tutorial […]
outstanding tutorial here.. i really loved it 🙂
I’ve been doing HDR on and off for a while now with varied results, but this has really helped. Awesome tut, cheers.
I purchased the book. It is a great instruction manual on how to make HDR images!
[…] camera. Look for Exposure, AEB (Automatic Exposure Bracketing), A-EV, BKT (more on that here and here), or a little +/- […]
great tutorial…superb in fact. Your screen captures and images used throughout are invaluable! I’m buying your book as a priority just out of shear madness (early christmas actually).
[…] camera. Look for Exposure, AEB (Automatic Exposure Bracketing), A-EV, BKT (more on that here and here), or a little +/- […]
Thanks for the tips. I’ve been really wanting to produce HDR images. Will study more about HDR from your site ^_^. I hope your book is available here in our country. 🙂
Great stuff! I have been doing alot of HDR testing on my Nikon D700 with different number of exposures. I tried 5, 7, & 9 shots at 1 ev and agree with you: 5 shots -2,-1, +1,+2 seem to be the best results. Done right, HDR is fabulous, especially with a contrasty scene- especially landscapes with different color of clouds.The only area I haven’t got good results are people pictures-colors tend to look physcedelic! Any suggestion?
Regards, Mitch
Thanks for this good and clear information. It is very helpful.
mm. good one 🙂
dear friend,
excellent article, thanks a lot, i spent a lot of time reading and adoring the really beautiful shots you have taken, just learning to photograph, maybe i can do this too, will try myself 🙂
thanks a tonne
B
New Delhi – India
I just want to compliment you on the great articles that you have put together. I have some scenes that I shot a while back, and I am improving them each time I try based on your work.
I do have a suggestion regarding the 3 shot AEB camera that I have been using. I set my Canon 30D at 1 stop AEB on Aperture Priority, then I turn on the timer. After the timer winds down, I get 3 instant shots starting at -2, -1, 0. I quickly roll the dial to give me 0, +1, +2. This gives me 6 shots of which I discard one. I end up with 5 exposures with limited movement of the camera.
Thanks again,
DMU
I have a question, what happens if I shoot the work horse, but go with 2 under exposed images at -2 plus the other images? Does a second photo of the same exposure add weight to the under exposed side?
Thanks
Actually Darrin you won’t benefit by duplicating the same image. Good Luck.
[…] camera. Look for Exposure, AEB (Automatic Exposure Bracketing), A-EV, BKT (more on that here and here), or a little +/- […]
Fabulous stuff here.. I was actually reading thru some stuff on Flickr about Bit depths and F-Stops.. I’m not pretty clear about the procedure now, let me look to doing some of the analysis you’ve done to see some of those results for myself.. I guess I’ll be refering lot more people here in future.. Absolutely great stuff and effort.
[…] als Datei-Typ den RAW-Modus. Wann Ihr welche Anzahl an Blendenstufen benutzt könnt Ihr hier noch mal genau nachlesen. In der Regel reichen aber 3 oder 5 bei […]
[…] http://beforethecoffee.wordpress.com/bracketing-number-of-images/ […]
Thank you for your experience!!!
You are a very good photographer!!!!
Wow. The train tunnel picture is just amazing! What camera did you use to take that shot? And which camera in your opinion is best for HDR photography?
Amazing Tutorial. I’m trying to learn more about photograghy for a coffee blog I started this fall. I do some sailing and morning coffee is part of my routine. Many mornings as I drink a cup of coffee I’m amazed and would like to share with others the sights I see on the Great Lakes in northern Michigan. Thanks for you in depth Information.
I just discovered you site, and it is absolutly fantastic to find someone who really has something to say. Today there are many photographis sites that talk but no one seem to ever tell anyone how to do anything. Your photography is fantastic.
I am still using film and your site is helping me make the change to digital as I can now see a way around the short comings in digital. I also just ordered your book.
[…] for some high res bracketed images. Optimal dynamic range explained by Ferrell McCollough > HDR Dynamic Range HDR resources from HDRSoft > HDRSoft HDR […]
thanks for this great tutorial, it was so good I’m now reading your book.
would be great if there was more information on setting cameras up like my canon 5d mk2 for the best hdr experience.
cheers
Adrian
great tutorial, all of your tutorials on hdr are really informative and helpfull even after having read lots of other ones already. Very clear and you seem to highlight all the issues or questions i have had so far. I only have one question after reading this tutorial regarding bracketing, basically from reading all tutorials on the subject they all seem to sudjest that you need that have your exposures equally spaced above and below 0EV. If you can just shoot the one extra image then does this not throw out the balance? If not does the exact spacing matter as long as each expose overlaps?
(i only ask as i am using a canon G10 and when shooting in manual i do not get any exposure information past +-2EV and therefore cant bracket correctly)
Good Morning,
Your one of the best – hands down. Your attention to detail is remarkable. When is your 2010 – 2011 book edition coming out AND is there any possibility of you doing any video tutorials?
Best regards
Joseph :o)
hello blogger, i was reading your posts on Bracketing/# of Images » Before The Coffee and i definitely liked them. one thing that i noticed while browsing throughout your blog that some of the links are not working and giving error. this makes the reading experience a bit sour. you’ve a good blog and i will request you to update the hyperlinks so that interested folks can get all of the information they intend to have. By the way are you on twitter?? i would definitely like to follow you and also get up-dates in your blog.
Thanks for sharing all this knowledge.I really think my pics improve since reading your site
Thanks for this tutorial, about the most helpful thing I have seen written up on the subject. It was great to stumble across it in the Panoramic Photographers Page on FB.
Thanks for this tutorial, about the most helpful thing I have seen written up on the subject. It was great to stumble across it in the Panoramic Photographers Page on FB.
This was very informative and reinforced the HDR fundimentals I have been learning. I noted in another post that I have no choice but to manually bracket my shots. I can’t bracket fast enough to eliminate cloud drift here in north Florida. Is there anything I should do in pre or post processing like …masking the sky from the best single shot, tonemap it and drop it into the HDR that comes out of Photomatix?
It’s great to read your tutorial! But today is 09.2012 and olmost 5 years as you created this one. Do you have any new artical on this subject working with CS6/Lightroom4.2 and Canon Mark5dIII. Thank you.
Hi Xoka, Rather than writing “how to” articles on the latest HDR software versions I prefer articles on the fundamental lessons in HDR. I do all my HDR work in Photomatix and CS6. Thank you for visiting, Ferrell
TWO AEB sets are fairly simple, your camera has a feature called Exposure Compensation that you can dial in before the AEB set is shot. First dial exposure compensation to –2EV, shoot 3 images @
When you explain the two AEB sets am I to understand the we’ve set the camera in Aperture priority?
Should one read the image first, then turn to manual and compensate the relevant -2 +2?
I have compensated +2 and -2, aperture priority, 100 ISO and get 6 shots, all different in exposure; the 2 that you mention that should be the same are not present, not that this should matter much.
Javier
[…] Bracketing/# of Images » Before The Coffee – This article was added to on November 15, 2010. My work in HDR is not theoretical but actual hands-on testing of the kinds of scenes we experience every day…. […]
Good tutorial to understand HDR. But I don’t find auto AEB in my sony A7.
How can I take good HDR with SONY A7.