
.jpg)
Ghosts – Don’t be Afraid
If you shoot enough image sets and merge them to HDR you’ll eventually have to deal with ghosting. Ghosting occurs when an object in the scene was in motion during exposure of the image set. Each image records the object in motion in a different position and the final HDR image will display the object in a “rubber stamp” look.
This article addresses methods to deal with ghosting. There are basically two methods to reduce ghosting: during shooting and during post-processing.
During Shooting
1. Shoot in continuous mode.
2. If your camera allows you to set order of bracketing choose: Meter, Under, Over. This is better than Under, Meter, Over. Why? Merging just the Under and Over exposure is often a good alternative and if they are shot back to back then motion is minimized.
During Post-Processing
Create the HDR image (use Ghost reduction) then blend one of the single exposures into the HDR image. But which is the best single exposure? The answer is to choose the best exposure of the ghosted object. Sometimes, however, you may favor a particular image based on the position or look of the object in motion. This is ok but you may have to deal with a poor exposure that introduces noise.
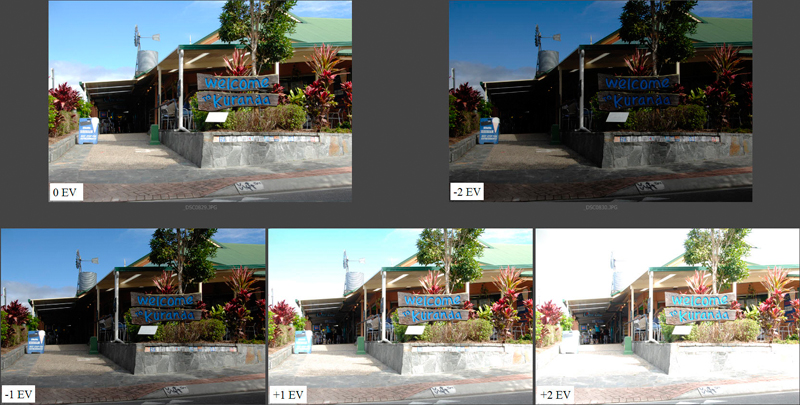
Here’s a five image set that captures the full dynamic range of the scene. It was shot hand-held in continuous shooting mode.
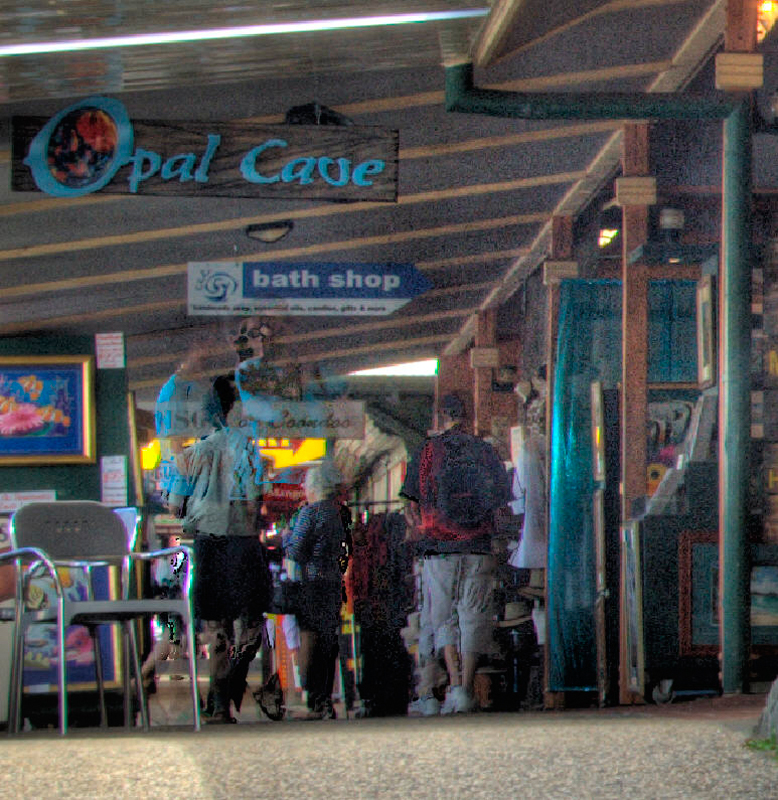
In the shaded area the people walking have ghosted and destroyed the details in the HDR image.

The best single image to use for blending is the +2EV image as it captures most of the details in the shaded area. The top image is the HDR image and the bottom image is the single +2EV image that was tone mapped using the same settings as the HDR image. Had I preferred any other single exposure of the image set (0EV, -2EV, -1EV, +1EV) I would have to deal with the potential for noise.

Drag the +2EV image over the HDR image (hold the shift key to center).
Click on Add Layer Mask – hold Alt(Option) key while clicking to fill mask with black
Paint ghosted area with White to reveal the detail in the “Single Plus 2EV” Layer
To show the masked area in pink there is a neat little trick – press the “\” key.
Notice the masked area includes some of the underside of the awning – I did that to eliminate some noise seen when zoomed in.
Here is the final HDR image with the ghost problem repaired. Remember that ghost repair may require another single image – for example the 0EV for the leaves in the tree.
Beach Surf
For this scene along the beach in Australia I took 5 images at 1EV spacing. Tripod and continuous shooting mode was used. I decided to minimize ghosting in the final HDR image by only merging 3 of the 5 images, the 0EV, +1EV and -2EV. I chose the +1EV because it captured the best position of the swash onto the beach.
Notice the ghosting in the swash – you can pick out the 3 exposures – the first is the 0EV, the second is the -2EV and is just a fine line due to the faster shutter speed and the last is my favorite exposure which is the +1EV.
Here is the ghost repair:
1. Background is the HDR image with ghosting.
2. “Plus 2EV image” layer is the tone mapped single +2EV exposure. See black mask with white.
3. “Bi-Color Violet/Pink” layer. I added this layer simply for a color cast.
The final image with ghosting removed from the swash.
This is very helpful. I really like the explanation of how to eliminate the noise as well as the ghosting. I have interested several people in hdr, and always refer them to your site. Thanks for the great tutorials. Beautiful capture! Still amazing.
That really is so nice of you to explain how you do this, Ferrell, and you are one of the best.
Thanks for the information. I always wondered how to remove ghosting. I Will try with my shots some time soon.
Great Photos!
Thanks.
I have to go back to this…and try hard…:-)))
Thank you for sharing this with us!
wow, i finally got a correct instruction of eliminating the ghosting of moving object here!! btw, i am a hdr lover in taiwan, and i have wroten few articles on magazine and main DSLR website, maybe we have opportunity to corporate a chinese translation of your latest hdr book?
This may work for CS3 but any solution for elements users?
Hi, Ferrell. Thanks for this helpfull instruction.
Here is a Russian translation of your article: Удаление «призраков» на HDR фото.
Hi!
I would like make better my SQL knowledge.
I red really many SQL resources and would like to
get more about SQL for my position as mysql database manager.
What would you recommend?
Thanks,
Werutz
Hi Ferrel,
HDRTools has a Separator function in the HDR processor.The instructions for HDRTools aren’t strong, so (if you update your book, and I will buy it if you do!) could you expand on the tutorial for HDRTools, similar to your Photomatix tutorial? The nuances of FDRTools, including the Separator for ghosting, are a bit confusing.
Thanks, steve
el oz de dolor horse anky paro de colectivos
There has come winter 🙁
It became cold and cloudy!
Mood very bad 🙁
Depression Begins
Thanks!,
Глубокоуважаемые, а нельзя оставлять комментарии по теме, а не разную глупость типа Плюс 1 и т.д.
Я подписался на РСС ленту, но посты почему-то в виде каких-то значков непонятных 🙁 Как это исправить?
Вот поэтому и не хочется иногда двигаться вперёд!
This tutorial makes the assumption that you will have an image in your batch collection that will have the EXACT color you need for fixing the hdr image. This is almost never the case so basically you have to find the image from your batch collection that most closely matches your hdr image and then do a ton of processing on that batch image to get the color to match your hdr color exactly so that when you mask, the colors will match. Just wanted to let people know so that when they try and follow these instructions they’ll know why they’re not getting the results they expected.
You are correct there are many variables that can cause problems in the masking, consequently chose the best exposure for the region you intend to mask, then tonemap it before masking, you won’t have to do a ton of processing, just a half a ton. Also, If you pump up the color with the saturation slider when you tone map the colors will never match. Let’s face it, hdr can be a lot of work for many types of images. Before I shoot an HDR image set I consider how labor intensive it might be to get what I want, I often don’t go with the hdr set throughout the image. Good Luck, Ferrell
giojk;k
mgj’l
u0[pop]\pik]op]\p
Sorry for perhaps this stupid question, is this the ghost repair done from within photoshop?
Что касается непосредственно, то мне кажется актуальность будет известна только через некоторое время.
Без дела жить — только небо коптить. 🙂
[…] waves are always problematic for the HDR/panostitching. Doesn't mean you can't fake your way through. If you go further down the HDR/pano path, chances are good you're going to get really good at […]
Thanks Ferrell for introducing me to the world of HDR. It’s been a major step forward for me and my hobby. Your photography is inspirational.
Thanks for the very descriptive article, and I will in return bookmark it. I am always on the lookout for the best tools that are available on the market.
Remove ghosting of people. Here is another trick I use when making VR tours. I have been requested to do stores full of people but produce a photo of a store without people. Basically if people are moving that is good. This works well when using a tripod. Keep taking several shots every few minutes and eventually you will get enough photos with the areas empty of people. Just feather cut in the empty areas into your best shot. I do this all the time while using bracketing at the same time. Comes in handy when asked to shoot the pool or beach at the condo.