
.jpg)
What is HDR Photography?
High Dynamic Range Photography is the process of taking several pictures of the scene and changing the exposure setting in your camera for each picture. Once the images are taken (hopefully RAW files) the images are downloaded to your computer. With HDR software, the images are analyzed pixel by pixel. The software takes the best pixels of each image and outputs a single file with all the best pixels. Of course there is lots going on behind the scenes but that’s the general idea in lay terms.
Taking an Image Set
The first image should be what your camera thinks is the best overall exposure for the scene. That’s called the 0 exposure value or 0EV for short and is shown here. Notice there is a wedge of color missing in the sky (blown pixels) AND the rocks in the foreground have no detail.
-
The dynamic range of the scene exceeds the dynamic range of my camera sensor.
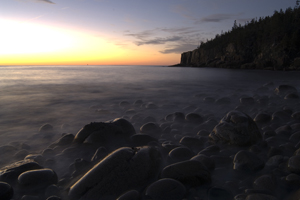
0EV
The next image I take is over exposed – you know the one’s that look all washed out. It’s taken in the same position as the 0EV image, but it’s 2-stops over exposed or +2EV.
-
The over exposed picture captures shadow details in the area of the rocks.
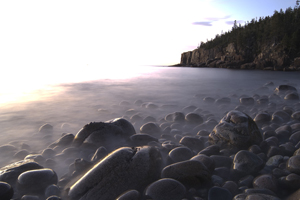
+2EV
My last picture is taken at -2EV or 2 stops under exposed. This exposure captures details in the sky that the other two pictures lack. Notice the wedge of brightness in the sky is now saturated with color.
-
The under exposed picture captures highlight details in the sky.
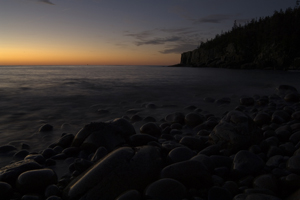
-2EV
We just took 3 images @ 2EV spacing. Add that to your everday conversation with photographers. It is the undisputed workhorse of HDR photography. It will provide sufficient dynamic range for most scenes and can be easily done with most cameras.
**The high end Nikons and the new Fuji S5 Pros are set up to shoot 1EV spacing. That means each image set will be 5 images @ 1EV spacing. You can omit the +1EV and the -1EV if you like.
Here is the final image after merging to HDR in Photomatix Pro software.
![]()
I never knew my camera could change exposure settings?
Most cameras, even point and shoot’s, have a feature called exposure compensation that allows you to dial or toggle in a new exposure.
Can I take my shots in JPEG mode?
HDR photography can be done in RAW mode or JPEG mode. Shoot in RAW mode if your camera has it, you can sqeeze out a little more dynamic range. The father of HDR, Greg Ward, conceived, designed, wrote, and tested HDR using JPEG images.
Can I do this handheld or do I need a tripod?
HDR photography can be done handheld, however just as in all photography, using a tripod will improve quality. Photomatix Pro is able to align the images but don’t get to relaxed about it. It can’t correct for a sloppy shooting style. Here are a few points:
Handheld shooting:
-
The camera must have Auto Exposure Bracketing. First you dial in Auto Exposure Bracketing (AEB), compose, then press the shutter release button to take the images. No fumbling with the camera between exposures.
-
Always scope out a steady object to lean the camera on. If it’s a pole just press the edge of the camera against it.
-
If you must shoot free-standing then concentrate on being steady during the entire image sequence. Lock your eyes on the brackets in the viewfinder and “register” it with a spot in the scene.
Ok, now you have a bunch of pictures that you’ve downloaded and it’s time to create some HDR images.
You can stop by and see my Photomatix Tutorial in this blog.
You can also download a free trial version of Photomatix from www.hdrsoft.com
Get 15% off the Photomatix program (reg. $99) just by entering “beforethecoffee” in the coupon code box of the Photomatix purchase page.
waw and waaaaaaaaaaaaaaaaaaaaw
imust do something like that
iwill try
thank for this exellent lesson
aisha
Wow, what a great shot….
[…] Read More… […]
Thanks for the $15 savings! Just out of curiosity, have you used the panorama factory too?
>John, Your welcome and I’ve used PTgui (www.ptgui.com) and Autopano Pro (www.autopano.net) for stitching HDR image sets.
Thanks for the tutorial it is the best one I have read so far.
I linked it from my flickr site. Saves me a lot of time not explaining to people how I do things.
It would be interesting to see how you processes you’re single raw files. Any chance of that?
Hi,
thank you again. I just wanted to save some of your tutorials to print them out, when I remarked, that there is a missing image above 😉
Greetings from switzerland, Christian.
I’m not able to actually view the Final image on this page. It just has the name of the picture listed. I’d love to see the final if you still have it. THANKS SO MUCH FOR THESE TUTORIALS!!
.moses.
Thank you so much. I was actually curious about what HDR is all about. This is very informative. Im excited to try it out myself. =)
Didn’t know where else to contact you regarding your book. I enjoyed the book and learned a lot. Since I suspect that it will go into more printings, I wanted to point out something that you might want to relook at.
In the book you mention many times the Photomatix Highlights & Shadows -Adjust method of combining images. What you forgot to mention is where to find this technique and that it is not, strictly speaking, an HDR technique and so is not accessed through the HDR menu of Photomatix. I scoured the book from cover to cover looking for any screen shot of this technique but couldn’t find one. Of course I did eventually find it on my own and all is well, but for some people like me who wanted to try the technique it was a hard to figure out where to find it. It was not also clear when you would want to forgo HGR imaging in favor of exposure blending. I appreciated the two images in your book of an interior, with the tone mapped image exhibiting “dirty” walls.
I was also wondering about stacking an HDR processed image and one or more of the original images as layers in PhotoShop and then using blending modes to bring back some richness in the shadows that might have been lost in the tone mapping process.
Finally, I am really enjoying the Photomatix Lightroom plug-in. It really makes it easy to get images into and out of Photomatix.
-wick
This is a great site with well presented articles!!
Now about this HDR thing. I’m stuck with a camera which will only give 3 bracketed shots.
My question is: can I take the 3 bracketed shots with a -2(or what ever) spread then take 3 more shots at a different bracket spread and still combine them? This is keeping in mind a totally static scene of course.
Thank you
Jim
One additional tip – use always a self-timer for shooting – with tripod or from hand, with HDR or “normal”. On my S95 I use 2 seconds for tripod shooting and 5 seconds for free hand. With a tripod this avoids the vibrating of the camera after pressing the shutter button, with free-hand I have time to press the shutter button, press my arms to the chest, breathe out and can so stand petrified for the duration of the AEB shooting.
HTH – and many thanks for this excelent site !
Meiki
helow any body can help me how to set my d90 to hdr
I discovered HDR photography just after I bought my Nikon D3100. Unfortanely, it has NO AEB feature!! So, I’m bracketing manually and almost always using a tripod.
The manual bracketing slows down the process considerably. So, if there are moving clouds, they sometimes look unreal.
Recently, I’ve been experimenting with single shot HDR. I change the metering to “matrix” (averaging). I shoot at 0EV and process the Raw image 3 times in Photoshop Elements Camera Raw. So I have a -2EV, 0EV and +2EV. Then I process through Topaz DeNoise before Photomatix Pro. Finally, I use Topaz Adjust on each image.
You can view my 1st attempts at one-shot HDR here: http://photobucket.com/Wekiva
Any comments suggestions would be greatly appreciated.
Just a brief comment: I received your book in the post today. Eager to get into it!
Javier
It looks just like the picture.