Before The Coffee » Photography

Tracks

Tracks

  • John Barclay - March 19, 2014 - 7:35 am

    I like the tones in Tracks. Nice job Ferrell. Looks like you’ve gone a bit viral with the light leak video. 🙂ReplyCancel

  • Ferrell - March 19, 2014 - 7:24 pm

    I think the light leak has a lot of people who have the camera concerned. It’s the type of photography that has caught camera engineers by surprise – long daylight exposures with ND filters. Sony is not the only camera so they all need to step up their machining tolerances. Keep up the great shooting John!ReplyCancel

Back to TopShare on FacebookTweet thisPinterest

The maximum flash sync speed for the A7r is 1/160 sec and for the A7 it is 1/250 sec. Above those speeds is High Speed Sync territory. For a explanation of High Speed Sync scroll to the bottom of this post and read: “An explanation of High Speed Sync.”

NOTE: I use White Lightning studio strobes and Nikon SB-800‘s with Pocket wizards so HSS is definitely not possible. However, the Sony HVL-F43M and 60M both have HSS so it should be possible with the A7(R). I’ve also heard that the Metz 52 AF-1 for Sony will also work in HSS Mode. Also, wireless with a small HVL-F20M on the hotshoe and a Metz remote will also work. The Metz 52 AF-1 is worth a look for the price and quality.

WHY would I want to use High Speed Sync?
1. High speed sync is good when shooting sports where a fast shutter is needed and fill flash is desired for shadows.
2. High speed sync is good in non-sport situations when shooting into the sun and you want to open shadows AND expose for the sky.

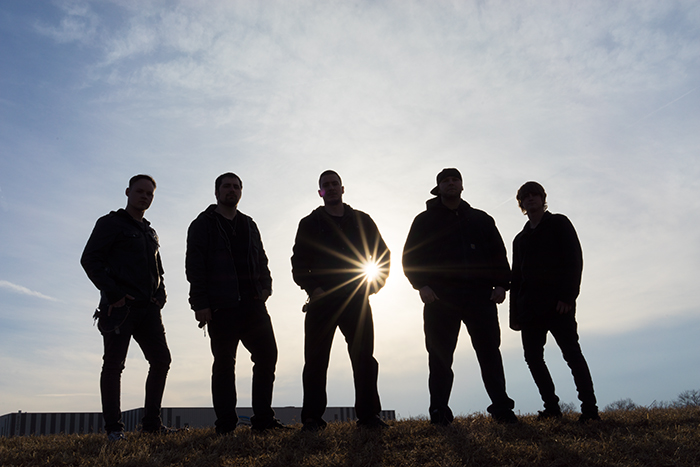
This image has no fill flash, exposure is for the sky while shooting into the sun. F/22 (for the star burst), 1/250, ISO100.

This image has no fill flash, exposure is for the sky while shooting into the sun. F/22 (for the star burst), 1/250, ISO100.

Let’s say for example I want to take a picture outside and I want fill flash on the subject AND the sky nicely exposed. If I expose the sky properly I might need: f5.6 @ 1/800 ISO 100. My flash cannot work at 1/800 unless I have high speed sync ability. So my alternative without high speed sync is to shoot at f5.6 @ 1/160 ISO 100 but overexpose the sky more than 2 stops. The dynamic range of the A7R is so incredible that this setup can work but may push the limits of good techniques in post processing.

What are my options if I have a flash without high speed sync abilities:

  1. Over expose the sky.
  2. Stop down to f/13 – not always viable because flash at full power may not have the distance.
  3. I could move closer to the subject and shoot f/13 @ 1/160sec, certainly possible.
  4. Set-up multiple strobes for more flash power, certainly possible with the right equipment.
  5. I could try to shoot at faster shutters than 1/160 sec. and allow the flash to be partially blocked by the shutter. Certainly possible with some understanding of the A7r shutter.

This posts explores number 5 with the Sony A7R. How much can I exceed the maximum flash sync speed and still get useful images? I worked with a rock band recently and we planned a sunset shoot. While we waited for sunset I did some test shots that exceeded the maximum sync speed of 1/160 second. I also took some studio shots of a backdrop with a scale marking 0-100% from top to bottom. When the shutter exceeds the maximum sync speed the top of the image becomes blocked by the flash exposure and the percentage can be read off easily.

Conclusions with the A7r:
When exceeding the maximum flash sync the flash is blocked from the top of the image and moves down as the shutter speed increases.
1/200 sec can be successfully used with minor post processing.
1/250 sec can be successfully used in situations where flash exposure is not needed in the top 20% of the image or a crop and post processing is done.
1/320 sec can be used only in rare circumstances. About 40% of the image will be blocked by flash exposure. This setup requires ambient light.
1/400 sec I would stay away from this shutter speed and flash exposure all together.

NOTE: A flash image really consists of two exposures, one of flash that falls on the subject and one of ambient light. During “normal” flash photography (not HSS) the f-stop controls the flash power and the shutter speed controls the ambient. Why? Remember that the flash duration is very fast, 1/4000 sec for example, so a shutter speed of 1/40, 1/60 or 1/160 will not have an impact on how the flash lights the subject, but it will impact the ambient exposure. However, when in High Speed Sync the shutter speed does influence the flash exposure.
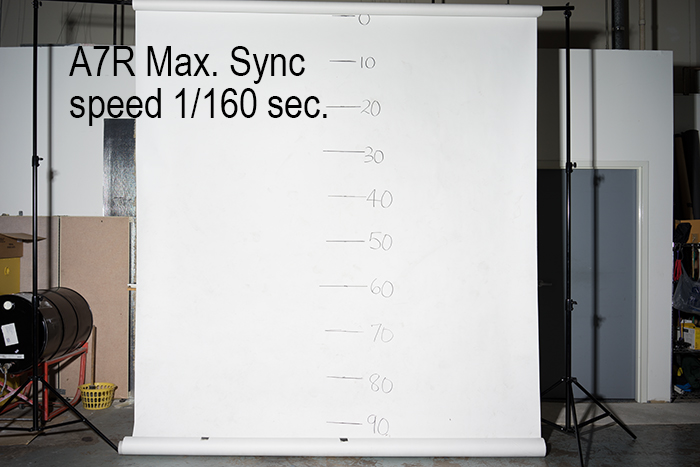
The maximum sync speed of the A7R is 1/160 second. Here you can see that the shutter does not interfere with exposure.

The maximum sync speed of the A7R is 1/160 second. Here you can see that the shutter does not interfere with flash exposure.

At a sync speed of 1/200 second there is a minor impact on the image. The slight darkness can be corrected in post-production.

At a sync speed of 1/200 second there is a minor impact at the top of the image. The slight darkness can be corrected in post-production.


At a sync speed of 1/250 second the top 10-20% of the image is blocked from flash exposure.

At a sync speed of 1/250 second the top 10-20% of the image is blocked from flash exposure.

As you can see the subjects are well within the area of flash exposure.

At 1/250 second you can see the subjects are well within the area of flash exposure.


At a sync speed of 1/320 second the top 40% of the image is blocked from flash exposure.

At a sync speed of 1/320 second the top 40% of the image is blocked from flash exposure.

At 1/320 second.

At 1/320 second you can begin to see the top 50% area is slightly impacted by loss of flash exposure. This could be corrected in post processing.


At a sync speed of 1/400 second the top 60% of the image is blocked from flash exposure.

At a sync speed of 1/400 second the top 60% of the image is blocked from flash exposure.

1/400 second gets very little flash exposure at the bottom. Only useful when it

1/400 second lacks flash exposure at the top 60% of the image. This is only useful when it’s carefully planned as part of the composition. Obviously this is not a successful setup for this shot.

Final image taken at sunset. f10, 1/200 second, ISO 400.

Final image taken at sunset. f10, 1/200 second, ISO 400 with fill flash.

DSC03671

About 2 weeks later the band added another musician so we did a retake. I thought this was a cool shot for a band named, “Sky Came Burning.”


An explanation of High Speed Sync

You can think of it this way. Imagine you’re sitting in the seats of a theater waiting for the show to start. The show begins and Curtain Man A opens the curtain from left to right. He pushes the curtain open but you cannot or would not want to take a picture until he reaches the other side. Curtain Man B closes his curtain and he also moves from left to right but he’s pulling a different curtain closed.

If Curtain Man A gets to the other side and Curtain Man B waits before closing his curtain, then you have a clear shot of the entire stage. At the moment your picture is taken Curtain Man A and B are at opposite sides of the stage and your flash pops (1/4000sec.) and you get a picture of the entire stage. This is your camera at sync speeds slower than 1/160 sec.

If Curtain man B leaves precisely when Curtain Man A arrives to the other side then at that precise moment a clear shot is obtainable. A fraction of a second before or after that moment either A or B respectively is blocking the stage with their curtain. That is the maximum sync speed of 1/160 second. Curtain Man A starts and 1/160 sec later he arrives at the other side, then immediately Curtain Man B begins closing.

If Curtain man B leaves BEFORE Curtain man A gets to the other side then your single flash exposure will not get a full shot of the stage. The sooner Curtain Man B begins his walk pulling the curtain across the stage, the more the stage will be blocked. Remember you cannot take your picture until Curtain Man A reaches the other side. So your picture will be a portion of the right side of the stage. These are sync speeds faster than 1/160 sec.

So how is high speed sync possible? Well it’s possible if the flash pop’s on and off very fast. In this scenario, you take the picture and Curtain Man A leaves the left side. Right behind him Curtain Man B begins his walk too. While Curtain Man A and B are walking across the stage there is a small gap between the curtains to view the stage. During their walk, your flash is popping the entire time, exposing the stage as they walk along….1/4000, 1/4000, 1/4000, 1/4000….. The flash continues to pop until Curtain Man A reaches the other side. The continuous popping of your flash allows you to expose the image with flash while using shutter speeds of 1/500, 1/800, 1/1600, even 1/3200 etc.


This is taken at f/16, 1/1250sec with the D3, single camera strobe full power. As shutter speed increases the power of the flash has to increase, or get closer to the subject. I shot at f/16 for the star look in the sun.

This is taken at f/16, 1/1250sec with the D3, single camera strobe full power. With HSS as the shutter speed increases the power of the flash has to increase, or get closer to the subject. I shot at f/16 for the star look in the sun.

  • Ferrell - March 15, 2014 - 6:43 pm

    I was asked about HSS and Sony flashes on the A7(R):

    I use White Lightning studio strobes and Nikon SB-800‘s with Pocket wizards so HSS is definitely not possible. However, the HVL-F43M and 60M both have HSS so it should be possible. A photographer posted at this site that the Metz 50 AF-1 for Sony will also work in HSS Mode with the A7R. http://www.getdpi.com/forum/sony/49715-hss-a7-7r.html
    ~Ferrell McColloughReplyCancel

Back to TopShare on FacebookTweet thisPinterest

Placing an ND filter on the lens and shooting a long exposure can give a nice moody feel. The technique is to shoot in normal daylight with ND filters and long shutter speeds.

The Sony A7R has gotten a lot of attention for light leaks that take place around the bayonet – where the chrome ring contacts the anodized orange ring.
http://community.sony.com/t5/Alpha-NEX-Cameras/A7-A7R-Light-leaks/td-p/254835

http://www.dpreview.com/forums/post/53072154

I started with black electrical tape and recently discovered a hair tie (elastics) to be an easy, non-sticky alternative. It’s easy to carry in any camera bag too. Get the Goody variety because it does not have the metal connector and “it will give you the hold you need and the comfort you crave.” They are available at drug stores or online. They are the perfect diameter to stretch around the lens and fit snugly at the joint between the lens and body. Even if you catch them with your fingers while handling the camera they snap back into the groove. Also, it’s easy enough to leave on to cut down on moisture and dust and the possibility that “normal” exposures might be effected by a light leak. The biggest bonus is that it’s NOT unattractive!
http://www.walmart.com/ip/Goody-Ouchless-No-Metal-Hair-Elastics-Little-Black-Dress-27255-36-count

Goody hairband around lens bayonet.

Goody hair tie around lens bayonet.

Light leak present in upper right and left side. 30 seconds, f/2.8, ISO 25600. Exposure made within 3 inches of 60W incandescent bulb.

Light leak present in upper right and left side. 30 seconds, f/2.8, ISO 25600. Exposure made within 3 inches of 60W incandescent bulb.

Performing the same test with the Goody hairband in place. No light leaks.

Performing the same test with the Goody hair tie in place. No light leaks.

Light Leaks with Studio Strobe (added 5/5/14)
I set up a situation that could be a real shooting scenario with the A7r and a studio strobe. The strobe was on full power 800w and the camera was held near the strobe in a manner that a photographer would stand while shooting and lighting a subject in the distance.  The camera was set up as if it was a conceivable shot, not a torture test or ridiculous settings – a subject in the distance and photographer near the strobe. If my position with the camera were in such a position that when the strobe hit the bottom area of the lens on the left side there was evidence of a light leak. The exif data is 1/60second, ISO800, f2.8 (the f-stop doesn’t matter because the light leaks takes place at the mount) 35mm f/2.8 FE lens. There is an opinion that testing for light leaks on the A7(R) is not a realistic test of the camera, after all “whoever shoots at ISO25600 for 30 seconds?” Well, this test demonstrates it can happen at 1/60sec, ISO800 too. I’m not in a panic about it, after all there is the hair tie.

VIDEO of the Light Leak in the studio: https://www.youtube.com/watch?v=cbq_zXK3o0c


Light leak with camera near strobe. Strobe was placed lower left of camera. Settings: 1/60sec. ISO800, f/2.8.

Light leak with camera near strobe. Strobe was placed lower left of camera. Settings: 1/60sec. ISO800, f/2.8.


  • Chris Gibbs - March 4, 2014 - 9:11 am

    Wow, that’s a torture test for any camera, my Canon 5D3 would fail that miserably with its leaky optical viewfinder! Next time you buy some Broccoli see if there’s a purple rubber band around the stems – I save those for no reason other than they’re good stout bands that are about 1/2″ wide. One could live on your lens hood until needed, it’d make for a perfect light seal.ReplyCancel

  • […] können all diejenigen, die mit den Problemen zu kämpfen haben, immernoch den simplen Trick von Ferrell McCollough verwenden, und ein Haargummi um die entsprechende Stelle am Objektiv spannen. Ja, das scheint […]ReplyCancel

  • Richard Saunders - March 5, 2014 - 12:53 pm

    That’s why Canon provides a cap for the optical viewfinder, to prevent such leaks.

    I was going to try tape on my A7r, but maybe I’ll try a wide black rubber band. 30 secs isn’t all that long an exposure either, I often shoot exposures of a few minutes during daytime with my Big Stopper. Can’t wait to see what Sony comes up with, though I won’t hold my breath.ReplyCancel

  • dyna - March 5, 2014 - 1:48 pm

    The problem I have with the torture test is that the light gathering, barring any form of reciprocity (which sensors have their own versions of) at 30sec at 25600 is equivalent to ONE FULL HOUR at ISO 200. In other words the vast majority of photographers will never see this, unless they are deliberately duplicating the test. 3 inches away from an incandescent bulb? Who does that if they’re not looking for hidden lemon juice letters?

    I agree that Sony should seal the mount, perhaps more for environmental purposes but if there aren’t enough photons to engage the sensor and register the flare until you hit 16 minutes at ISO 800, there’s not a huge issue to be made here. For most.ReplyCancel

  • Satoru Murata - March 5, 2014 - 9:10 pm

    I completely disagree that the high-ISO test (which is something that I came up with, and thenceforth has slowly spread around the Internet) is some, highly unrealistic torture test.

    First of all, the exposure time is not really an issue. Take a light tight camera & lens, put it in 12,800 or 25,600ISO and shoot it for 1s, 5s, 10s, or 30s. The longer the exposure, the more noise you’ll see across the frame coming from the heat-buildup of the sensor. However, you will NOT see the kind of crescent shape light leak you see with the A7/R. That’s because it’s light tight. The “stress test” could be ISO25,600 @ 1s, and you’ll still see the light leak as long as you have the light source up against the leaky spot on the flange. The only reason why the exposure would be long with the test is to give the tester enough time to take the light source around the flange and check the mount from all angles.

    Thus, comparing the stress test to a “ONE FULL HOUR” exposure @ ISO200 is pointless.

    https://dl.dropboxusercontent.com/u/131577/forums/FB%20Samples/DSC02723.jpg

    Here’s the photo I’ve been pasting all over the place in response to naysayers. This is an 8 minute exposure @ ISO100, f8.0, with a total of 19 stops of ND. Before anyone slams me that that’s also too extreme,

    https://dl.dropboxusercontent.com/u/131577/forums/FB%20Samples/DSC02718-Edit.jpg

    Here’s a more modest 2.5 minute exposure at ISO50, f22, and just 12 stops of ND. Anybody who does daytime LE work knows that 12+ ND is not “extreme” by any means.

    And you know what? The updated “Light Leaks with Studio Strobe” sample pretty much proves that I’ve been right all along, that the degree of light leaking that I saw in my images the very first time I did LE work with this camera, I might add, is nowhere near acceptable, or what should be considered “within spec”

    RE: Chris Gibbs

    Mmm, yeah, that’s why when you do LE with an SLR, you always put a cap on the OVF. You know, the cap that Canon (and other companies) *always* includes in their camera boxes? The OVF leaks light, there’s no way around it, because the mirror box is designed *specifically* to transmit light back and forth between the mount, sensor plane, and the OVF. In contrast a mount of a camera should always be designed to *specifically* be light tight. A very big difference.

    Sony certainly did not ship a hariband with my A7R :LOL:ReplyCancel

  • Chris Gibbs - March 5, 2014 - 11:12 pm

    @ Richard Saunders

    Google 5D3 light leak – its actually two-fold, the “cap” is only half the issue, the other light leak is internal.ReplyCancel

  • Mick Ryan - March 5, 2014 - 11:16 pm

    Thank you so much for this. Talk about synchronicity! Just yesterday (March 6) I took a real world shot for my client. A shot of the famous Bund in Shanghai with the A7r. It was a long exposure in the daytime with a 3ND filter to smooth out the water and I had exactly the same problem with identical marks to the ones you’re showing. On some images just one side and on other both sides. I was very confused as it couldn’t have been flare but not it makes sense and I will follow your fix for further shots. Thanks again.ReplyCancel

  • […] cosa viene de Sony Alpha Rumors y viene de Before the coffee.com donde veréis ejemplos del […]ReplyCancel

  • […] Image courtesy of Ferrell McCollough […]ReplyCancel

  • […] Ferrell McCollough discovered that the light leak can be stifled by simply putting an elastic hairband over the area […]ReplyCancel

  • […] obvious fix is to put gaffer’s tape around the mount, but photographer Ferrell McCollough had something easier in mind. He used hair ties instead. Just pick yourself up some black hair ties at WalMart […]ReplyCancel

  • […] obvious fix is to put gaffer’s tape around the mount, but photographer Ferrell McCollough had something easier in mind. He used hair ties instead. Just pick yourself up some black hair ties at WalMart […]ReplyCancel

  • […] obvious fix is to put gaffer’s tape around the mount, but photographer Ferrell McCollough had something easier in mind. He used hair ties instead. Just pick yourself up some black hair ties at WalMart […]ReplyCancel

  • […] Sony ne s’étend pas sur le sujet, mais indique travailler à une correction (je ne voudrais pas être à la place des ingénieurs qui s’en occupent). En attendant, il vaut mieux protéger cette partie de l’appareil avec du gaffer (scotch décollable), un gros élastique plat ou un chouchou (normalement pour tenir les cheveux comme indiqué sur BTC). […]ReplyCancel

  • […] Sony does not go into great details, but says that they are working on a correction for the issue (I would not like to be one of the engineers tasked with this). In the mean time, the owners would better be using soemthing to mask this part of the camera: gaffer tape, a large elastic rubber band, or elastic hair ties (as shown on BTC). […]ReplyCancel

  • Onar - March 7, 2014 - 10:05 am

    I put some tape over it…. easy solved. Novoflex also told me that you could adjust the screws to tighten the adapter to the lens used. I don’t bother, ’cause the black tape strip does take care of the leak…ReplyCancel

  • onar - March 7, 2014 - 10:09 am

    …of course, IF you use adapter. If not, use tape between lens and camera. The latter isn’t a good solution if you change lenses alot….
    🙁ReplyCancel

  • […] if you’re an A7 or A7r user experiencing these light leaks, a photographer by the name of Ferrell McCollough has a simple but apparently effective solution for you: an elastic hair tie which you can then put […]ReplyCancel

  • […] Aceasta este solutia propusa chiar de unul dintre utilizatorii care au observat bizara problema, Ferrell McCollough (foto […]ReplyCancel

  • […] Καταρχήν να αναφέρουμε ότι οι αναφορές λένε ότι οι Sony A7 και Sony A7r εμφανίζουν το πρόβλημα "light leak" σε συγκεκριμένες συνθήκες. Για να είμαστε ακριβείς όταν στην μηχανή ρυθμιστεί το ISO στα 25.600 και η ταχύτητα του κλείστρου στα 30 δευτερόλεπτα και υπάρχει στο κάδρο μας κάποιο δυνατό φως, τότε στην τελική φωτογραφία εμφανίζονται λωρίδες φωτός. Από ότι φαίνεται η είσοδος του φωτός γίνεται από την μοντούρα της μηχανής, δηλαδή το σημείο σύνδεσης του φακού με την μηχανή. Μάλιστα η imaging-resource αναφέρει ότι το ίδιο αποτέλεσμα μπορούμε να έχουμε και σε μικρότερες τιμές του ISO και για χαμηλότερες ταχύτητες κλείστρου αν το φως που υπάρχει στο κάδρο μας είναι πολύ δυνατό. Η λύση μέχρι τώρα στο πρόβλημα, η οποία αναφέρεται από χρήστες, είναι η τοποθέτηση μαύρης ταινίας γύρω από το σημείο της σύνδεσης του φακού με το σώμα της μηχανής, ενώ την ίδια δουλειά μπορεί να κάνει και ένα λαστιχάκι για τα μαλλιά (δείτε εδώ). […]ReplyCancel

  • […] March 19, 2014. In case if you want to fix the issue right now, then a photographer by the name of Ferrell McCollough has a simple but apparently effective solution for you: an elastic hair tie which you can then put […]ReplyCancel

  • […] Goody hair tie around lens bayonet (Courtesy: Ferrell McCollough) […]ReplyCancel

  • Doreme - March 11, 2014 - 3:57 am

    More tidy temp solution is an orange colored (that’s the color it comes in) O ring available in Amazon (comes in 25 or 100/bag). After testing various sizes, I found 2″ inside diameter x 3/16″ thick to work the best. This size allows you to stretch over the lens so that it holds tight at the gap between the lens and the mount. Just roll it up the lens when changing and leave it there. It’s cheap enough to leave one on each lens.ReplyCancel

  • doreme - March 11, 2014 - 4:02 am

    Sorry I meant 3/32″ thick O’ring. 3/16″ is a bit too thick.

    Here’s the Amazon link:

    http://www.amazon.com/gp/product/B000FMWPRE/ref=oh_details_o08_s02_i00?ie=UTF8&psc=1ReplyCancel

  • […] light leak has already been documented quite well by Imaging Resource, Ferrell McCollough, and others. We tried a couple of simple methods to determine where the light leak occurred and […]ReplyCancel

  • […] no encaixe da objetiva, vedando a área por completo. Uma outra solução, menos invasiva, é o uso de elástico para cabelo na cor preta, conforme apontado pelo fotógrafo Ferrell McCollough em seu […]ReplyCancel

  • Ferrell - March 11, 2014 - 8:53 pm

    Dorem: I don’t see the o-ring as a “more tidy” solution. I’ve worked with many o-rings and thought about it for this solution but discarded the idea because their elasticity is too limited to go over a lens and hood easily.
    O-rings are not designed to be “stretchy” they are designed to seal. In the cold they are even harder to work with especially 70A.
    Orange is ugly, they come in black you know.ReplyCancel

  • […] light leak has already been documented quite well by Imaging Resource, Ferrell McCollough, and others. We tried a couple of simple methods to determine where the light leak occurred and […]ReplyCancel

  • […] light leak has already been documented quite well by Imaging Resource, Ferrell McCollough, and others. We tried a couple of simple methods to determine where the light leak occurred and […]ReplyCancel

  • Ferrell - March 12, 2014 - 8:00 pm

    Consider that many tests show the light leak to be very overexposed at ISO25600 30sec. If you have an obvious light leak and continue to lower the ISO, just before it’s imperceptible then there is a loss of contrast. It would be subtle, maybe not even noticeable but you’d certainly give up some quality. You are probably getting some loss of contrast and you don’t even know it. A light leak is not like a light switch that gets turned on and off when you dial in ISO 25600, it’s a subtle gradation. You might be shooting in that subtle range everyday. Your images could be better and you don’t even know it.ReplyCancel

Back to TopShare on FacebookTweet thisPinterest

Note: Numbers in parentheses refer to Menu tab and window within that tab, i.e.. Custom Key Settings(26) is the Second tab and 6th window in that tab.

AF dominant setups:

If your primary shooting preference is Auto Focus, change the AF/MF Button to TOGGLE in the Custom Key Settings(26). You will remain in AF and in the rare instance you want to use Manual Focus you just press and release the AF/MF button. It will stay in MF until you press the button again. I suggest turning on focus peaking as an alert that it’s in MF. If the camera is turned off, the next time you power up the setting will be AF. This is the setting that I use most of the time, it is easy to move to MF when I find AF isn’t up to the task.

If you set AF/MF Button to HOLD in the custom Key settings then for the occasional MF you will need to hold down the AF/MF button while pressing the shutter release – a little bit awkward but doable with some practice. If you release the AF/MF button then follow with a half press of the shutter, AF will be reinitiated and your manual focus efforts will be gone.

Setting the Focus Mode(12) to DMF (Direct Manual Focus). This will allow you to stay in AF and then if you decide to use MF then all you have to do is turn the lens focus ring while half pressing the shutter button. If you use DMF I suggest setting the Focus Magnif. Time(21) to 2 seconds. If you use No Limit then you will need to take the picture while in magnify view. Not really a bad way to work but takes a little getting used to.

DMF Pros: Using MF is a fluid action and doesn’t require pressing buttons. Simply turn the focus ring and activate MF. DMF shows focus peaking while in Auto Focus.

DMF Cons: It’s not good for tweaking or confirming AF – turning the focus ring activates MF and the magnifier but also changes any AF settings. Once MF is complete in magnify view it takes 2 seconds to return to full view. This can be too long or too short depending on the circumstances. It would be nice if a release of the half-press instantly returned to full view and a repress within say 2 seconds would keep the MF setting just achieved. It would give the user full control in timing the on/off of the magnify function.

MF dominant setups:

If your primary shooting preference is MF with intermittent use of AF, first change the Focus Mode to MF, then you can change AF/MF Button to HOLD or TOGGLE in the Custom Key Settings(26).

HOLD is good because it allows you to press the AF/MF button and achieve AF without touching the shutter button. You won’t accidentally leave it in AF too. The only problem with HOLD is you cannot move the flexible spot AF area – it’s stuck where you placed it. You’ll have to get out of Hold, go to Toggle in the Custom Key Settings(26), then move the AF area. If you are ok with AF spot position always being fixed, (centered for example) you’ll get along fine with this setup. This is my preference for MF, it’s just a quick blip of the button, then back again.

TOGGLE will give you control of the flexible spot areas for AF that HOLD does not. However, when you TOGGLE to AF you’ll have to follow with a half-press of the shutter to achieve AF. A little more cumbersome. When the camera is turned off it will revert back to MF.

When should you turn AF w/ shutter OFF(24)? That means a half-press of the shutter will not initiate AF. You really don’t need to turn this feature to OFF. Even when it is ON when the camera is in MF it is off.

Continuous Focus and Continuous Shooting

This is the ideal setup for action shooting except things are a bit difficult with the A7R. The A7R does not have electronic first curtain – something that has been discussed at length in the forums with many pleas to Sony to release a firmware update. The challenge with the A7R is the EVF goes black at the start of the first frame making it difficult to maintain the Flexible spot focus on the moving subject. It’s like juggling and someone momentarily turns the lights off.

A second option is to turn on AF tracking. This allows the camera to attempt to track the subject. I’ve not fully tested the reliability of this feature but in general I’ve found them to be hit or miss. Much like most “Auto” camera features, Exposure, AWB, Flash etc. they do not always do what you want.

This is a vertorama taken with the A7R and the 35mm f/2.8. Manual focus on the rocks jetty in the distance for the top image and on the shells in the foreground for the bottom image. Both images taken at f/8.0 - a very sharp range for this lens.

This is a vertorama taken with the A7R and the 35mm f/2.8. Manual focus on the rocks jetty in the distance for the top image and on the shells in the foreground for the bottom image. Both images taken at f/8.0 – a very sharp range for this lens.

  • Peter Lee - April 7, 2014 - 12:08 am

    Hi from Australia.I have just purchased the A7r and am having problems trying to lock AF for stitching RAW images- dead easy on my Sigma DP Merrills.There will be times when I will use MF but I do need an alternative.I have been told that the best way is to move the switch to AF/MF depress the shutter half way until it locks focus, ease off the shutter altogether ,select Fn and change to MF.The focus will then stay locked ?.I have tried it and although it seems to work I still have my doubts- what do you think ? Is there a better way- I would hate to go for that once in a liftime shot down a gorge and find focus has shiftedReplyCancel

  • Ferrell - April 8, 2014 - 3:08 pm

    Hi Peter, I think with a little getting used to the A7R you’ll find it very easy to capture the RAW images for stitching. I would certainly start by setting the AF/MF Ctrl to Toggle in Custom Key Settings (26) then move the switch to AF/MF (top back of camera). Begin the pano setup with focusing either AF or MF and then press the toggle to switch to Manual Focus. All shots will be taken in Manual focus and the camera will not revert to Auto Focus unless you press the toggle switch or turn the camera off/on.

    Remember it’s best to shoot in M mode so your exposure remains constant across the scene. BEST OF LUCK!ReplyCancel

  • GK - May 9, 2014 - 5:25 pm

    Ferrell, thank you for posting that setup, I have been searching for the concise equivalent of Canon’s “back button focus” and what you detail here is just about it.ReplyCancel

  • Tim - July 15, 2014 - 8:30 am

    Just came across this great article after spending the last hour trying to make sense of the poorly written a7R user guides. Really very useful and concise advice here, thanks very much.ReplyCancel

  • Maureen - October 20, 2014 - 8:07 pm

    Thank you! I found the manual useless in setting up my a7s. You have helped me a lot.ReplyCancel

Back to TopShare on FacebookTweet thisPinterest