Before The Coffee » Photography

Hello everyone, I hope all is well. I’ve been absent for awhile, my dad passed away in November and this economy is so horrible I’m being careful about booking travel. But spring is around the corner and I look forward to emerging from hibernation.

Here is a recent shoot that I finished and I wanted to share my approach to getting the final image. I hope you enjoy.

UPDATE: The image you see now is updated from the original. I moved the guy closer to the edge, his right foot is now in front of the beam, I added some blur effects along his arm, leg and hair for added drama. I trimmed a little off the front corner of the train to make it narrower.
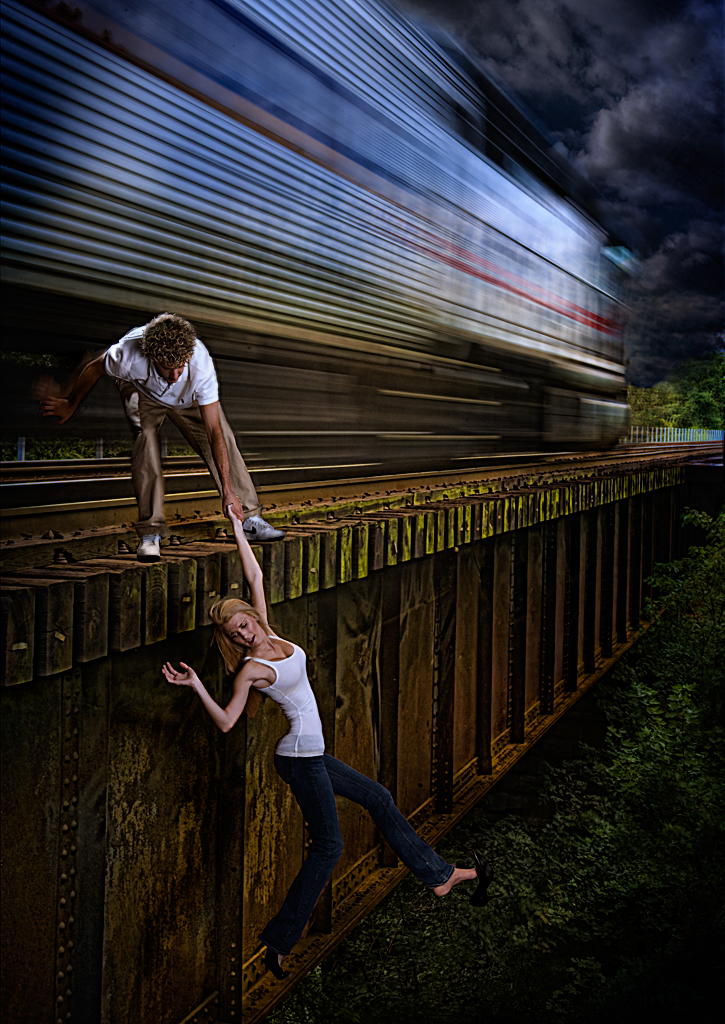
WEB2_Mod_DSC3398

The Concept
When a band contacted me for their new CD cover they only knew they wanted to title the CD “Take the High Road.” Ideas started stirring, and after some brain storming we settled on a theme “a guy saving a girl falling off a building or a bridge.” I visualized the guy holding her by one arm in an industrial setting, lots of steel with a dark gloomy mood.

The Search
I went with the idea of a girl falling off a bridge and began a local search for a highway bridge with big I-beam supports. I used local maps to scout for bridges that might fit the theme and I drove to each one and sized it up as a potential subject. I didn’t find what I was looking for and decided to try railroad bridges. The one I picked spanned a large river and had some rusty I-beams.

The Railroad Bridge
I had to walk a mile to the bridge and as I arrived a train whisked past and sparked a new idea. If I could shoot the scene with the train going past it would create a sense of urgency and provide the one element I always love in a shot – motion. I set up and took some HDR image sets, some cloud compositions and a pic of myself to scale the models into the scene later.
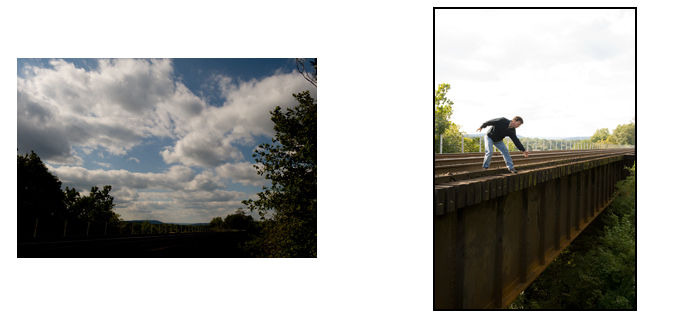
cloudme

After a couple hours a train came rumbling past and with camera on tripod and ready to go, I shot 5 images @ 1EV spacing. The camera was set on continuous shooting so the 5 images were done in rapid fire. Here you can see the order of the images 0EV, -2EV, -1EV, +1EV, +2EV.
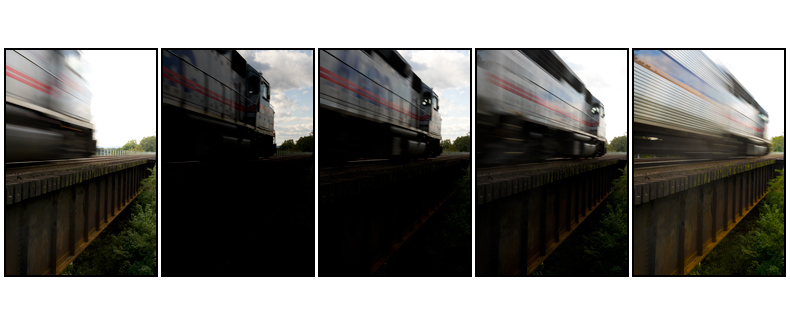
filveset

The Models
I found Chelsea and Kevin on Model Mayhem and they were very interested in doing the mock up shoot at the studio. The big challenge was to get Kevin elevated enough so Chelsea could hang with her arm extended and not touch the floor. I estimated he would need to be 9 feet off the floor. I also wanted to support Chelsea’s weight so Kevin wasn’t exhausted after 5 shots and he wouldn’t get pulled off the platform. Chelsea has her left bum on a high stool (behind the sheet).

The Set
When you are adding people to a scene it’s easier to place the colors behind them that approximate the scene colors. This is essential when the person has wispy hair and you want to avoid that cut-out look. Also, keep in mind, the tonality of the studio scene behind the model can transfer or wrap around their skin and clothing. For this set I attached fabric that approximated the color scheme of the railroad picture.

Here are few shots taken during the session. There were two flash setups, one for him and one for her. He was lit from above and slightly behind to simulate light reflecting off the train and then from his left front. She was lit with a softbox to her right and a beauty dish to her front and directed toward her face. That would allow some dropoff of light along her legs and simulate the darkening valley below the bridge.

modelouts

Processing
As a photographer you want all the tools at your disposal and it’s important to learn which tools are needed to achieve the qualities in the final image you are seeking. With all images from the train shoot I tried a variety of approaches from full on HDR to single image tone mapping to adding tonal contrast in PS or Nik Color Efex. In time you’ll be able to stand behind the camera and realize the type of processing as you view the scene.

For the train scene I prepared the HDR image and single tone mapped images. I got the best results from tone mapping the +2EV single image and adding the sky in a separate layer. I used the Nik filter midnight to darken the image then a mask to brush the darkness selectively.

That about covers this shooting project. Thanks for dropping by.

  • JRP - January 29, 2009 - 2:04 am

    You continue to amaze me. The effort that you put into this was so worth it!
    Absolutely fantastic final shot – I appreciate the way that you share the details of the set up and the how to.ReplyCancel

  • Herzeleyd - January 29, 2009 - 6:26 am

    Absolutely fantastic!

    Greetings!ReplyCancel

  • tck - January 30, 2009 - 11:25 am

    Where’s the guy’s right foot/shoe?

    See UpdateReplyCancel

  • Roy - January 30, 2009 - 2:37 pm

    Nice effect, but some niggles:

    – there is some fringing on the inside of the guy’s right pant leg, left by the ochre studio backdrop; perhaps blue/green chroma keying would have worked better?
    – wouldn’t you expect to see the effect of a train rushing by in the guy’s hair and clothes?
    – the way he is sticking his right hand across the tracks, it would get ripped off by the train.

    Hi Roy,
    Thank you. I don’t recall any fringing but I’ll check out the full-res version to make sure. I was pretty careful about avoiding fringing. WIND, actually when I did the shoot there was a large fan on high to my left. I brought it as close as possible and out of view. You might notice some of her hair is blowing in the last outtake. The dude had some tight ringlet hairstyle and the fan would move it. Had I to do it over I’d use some clips and/or string to pull the clothing to mimic the wind. Regarding the arm, there is actually lots of room between him and the train. I sized that when I did the self port shot. FM
    ReplyCancel

  • MEM - February 7, 2009 - 8:24 pm

    Good to “see you” on Blog again – and thanks for the explanation of all it takes to get the shot you want – the Art of it All. Fascinating, and my favorite part is the relationship shown by the motion.ReplyCancel

  • Roy - February 9, 2009 - 9:00 am

    Thanks for responding. I blew up part of the image to demonstrate the fringing:

    http://img.skitch.com/20090209-jj6isp88t617g7a6shyacu9561.jpg

    Kudos on having the presence of mind to use a fan in the studio shot. I would just expect to see more of an effect on the guy’s clothes when a train is rushing by at that speed and proximity.

    But I’m really just nitpicking here; this is a very strong image. I’m not sure what impresses me more, your photographic and retouching skills, or the girl’s waist size. 😉

    Thank You – See UPDATEReplyCancel

  • Mike Palmer - February 9, 2009 - 10:37 am

    Good to see Before the Coffee back in form- Great concept and execution!!ReplyCancel

  • Ade Lovatt - February 10, 2009 - 12:05 am

    Welcome back. I have your site set as a favorite and used to check it each day. My wife bought me your book for Christmas, excellent, I’d recomend that to everyone interested in HDR. Sorry to hear about your loss but good to see you return, I’ll start checking your site again.ReplyCancel

  • Wayne - February 14, 2009 - 9:18 am

    Ferrell,

    There is a new forum devoted to HDR: http://www.strictlyhdr.com/forum.htm

    Your name is being bandied about there, thought you might like to check it out.ReplyCancel

  • Jan - February 18, 2009 - 6:49 pm

    Hey man!
    Real nice project!!
    Loved the final result!
    Keep on posting these projects!ReplyCancel

  • John Adams - February 24, 2009 - 7:08 am

    Thanks for the detailed background Ferrell, some beautiful results and many ideas to contemplate!

    Cheers,

    JohnReplyCancel

  • Julissa - March 3, 2009 - 2:43 am

    Just dropping by.Btw, you website have great content!

    ______________________________
    Why this one-minute therapy is being suppressed in the U.S. while more than 15,000 European doctors have been using it to heal millions of patientsReplyCancel

  • Craig - March 10, 2009 - 12:00 pm

    Just bought your HDR book. I was disappointed with the HDRs I’ve tried, but a quick leaf through the book helped me see what I was doing wrong. I’m looking forward to doing some serious reading this weekend!ReplyCancel

  • Peter - May 11, 2009 - 8:52 am

    It’s really great to see how you achieved these effects. A great motivator to try things for myself. Thanks so much.ReplyCancel

Back to TopShare on FacebookTweet thisPinterest

We are all aware of the benefits of the circular polarizer in single image photography. It has the ability to darken the sky and remove reflections from shiny surfaces. I started wondering, could there be a benefit in using the circular polarizer when shooting HDR image sets or does the merging and tonemapping process nullify or eliminate the polarizing effect? I decided to create two HDR images of a scene, one taken with a polarizer and the other taken without the polarizer, then compare the results.

Some salient points about the polarizer.
1. Darkens the sky greatest at 90 degress to direction of light.
2. Removes reflections or glare (darkens water).
3. Degree of polarization varies with direction of light.
4. Images taken with wide angle lenses can have uneven blue skies (note: 24mm used below).

Single 0EV Images – Polarizer Left Image    No Polarizer Right Image

Compare these single images and you’ll notice the polarizer (left) has darkened the sky and has dramatically reduced the glare on the red chairs. Notice the Polarizer has also created a triangular shaped blue region in the top right. This is due to the 24mm focal length capturing a large region of sky and in this case the direction of light approaches 90 degress toward the top right.

HDR Images Polarizer Left Image    No Polarizer Right Image
(both tonemapped with default settings in Photomatix)

HDR processing of the polarized image set (left) and the unpolarized image set (right) has created similar tones in the blue sky. Using a polarizer doesn’t help the saturation of the blue sky when creating HDR images. The HDR merging process simply uses a less exposed image in the set to achieve saturation.

When it comes to glare reduction it’s a different story. The polarizer offers a noticeable benefit in the reduction of glare and more saturated colors when creating HDR images. Notice the red chairs and compare points 1, 2, and 3. I would still keep your polarizer in your camera bag and use it for glare reduction on those shiny surfaces.

  • JRP - October 13, 2008 - 8:07 pm

    Interesting comparison.

    I usually leave the polarizer on when I’m shooting outdoors so a large amount of my HDR images we taken with the polarizer on…now I question the need. 🙂ReplyCancel

  • Adrian - October 13, 2008 - 10:00 pm

    Thank you for bringing this up. I think the effect would have been more dramatic with pictures of some window or lake surface. The sky in your examples also lacks some clouds. The effect with those is well known but it would have been interesting to see how this turns out here.

    I guess I know what I’m doing the coming weekend.ReplyCancel

  • Mike Palmer - October 14, 2008 - 10:18 am

    Nice tip!ReplyCancel

  • Royce Howland - October 15, 2008 - 12:00 pm

    Ferrell, this matches my experience. HDR tends to even out the blue sky, which is one of the most easily seen “downsides” of using a polarizer on wide views… especially panoramic stitched scenes. So polarizer or not is something of a wash for that. Conversely HDR can punch up the blue, which may imply that the polarizer isn’t needed for that.

    But as you’ve found with the red chairs, the effect on glare (and therefore local contrast and color saturation on anything that was experiencing glare) is quite a different matter. I often use a polarizer in combination with HDR to get a better grade of “feed stock” to provide to the HDR merge process. As mentioned by Adrian above, common examples where I find the polarizer useful relate to anything with water or ice, specular reflections from metal or glass, and clouds or snow-capped mountain peaks that I want to “pop” against the surrounding sky. I sometimes shoot a double-sequence, once fully polarized and once fully non-polarized, so I can mix & match elements if I need a different part of the scene represented each way.ReplyCancel

  • Jeff Nyveen - October 16, 2008 - 2:58 pm

    Ah, I’ve been wondering about this for a while… Thanks!ReplyCancel

Back to TopShare on FacebookTweet thisPinterest

The band “Victory By Revenge” is preparing to release their first CD. The CD is titled “First Date Mistakes” and the band decided to use me to come up with a few pic ideas for the CD jacket. I had two ideas I felt strongly about. First, a scene where the car has run out of gas and the guy is pushing the car while his date carries the gas can. Second, the guy is in the restaurant checking out a girl walking by while his date reacts with strong disapproval. Has that happened to me, I’ll never tell.

I picked out the location for the “Out of Gas” scene – a quiet piece of roadway with the sun setting in the background. Then for the restaurant I asked a local restaurant owner if I could set up a shoot at closing time. I used models, Carlin, Molly and Anthony for the shoot. Both shoots took place the same evening.

For the “Out of Gas” shoot I was very careful to get the right expressions from the models. I wanted him to appear straining and her to appear annoyed by the whole situation – “look at him in disgust” I kept telling her.

For the restaurant scene it was equally important that expressions and body language were perfect. I told Molly (sitting) that for the last shot I wanted her to pick up the glass of water and throw it on him. Anthony had no idea it was coming and right on cue, Molly had her hand on the glass, I motioned for Carlin to walk through the scene and strike her pose and as soon as Carlin got to her spot, Molly threw the water on him. A cool surprise for him. It became the CD cover.

Here is the CD cover with a few of the other images we took that evening. Other First Date Mistakes added to the CD: running late, trying to kiss her at the wrong time, bringing broken flowers.

  • Mike Palmer - September 22, 2008 - 9:51 am

    Great concept for the band – First class execution!!ReplyCancel

  • jen rinaldi photography - September 23, 2008 - 8:19 pm

    I am soooooo impressed with your work! Seriously, there are fantastic!

    Wonderfully posed, great set-ups, and awesomely lit!! WOW!ReplyCancel

  • mikimiska - October 2, 2008 - 11:32 am

    The 2nd one is just amazing. Great idea and done it too. 🙂ReplyCancel

  • John B. - November 9, 2008 - 3:58 pm

    Fantastic Ferrell! Killer work and congrats on the gig. How’s the band?ReplyCancel

  • Jason - November 14, 2008 - 10:14 am

    Great vision and execution of it – the water throw was perfectly timed! Both shots also have a touch of HDR going on too – very nice effect that works well!ReplyCancel

  • free online christmas game - November 29, 2008 - 6:06 am

    Iwon’tevenbothertoansweryouReplyCancel

  • great gifts for christmas - November 29, 2008 - 10:28 am

    Oh,no!ReplyCancel

  • 2005 new year - November 30, 2008 - 2:37 am

    Great Site,Keep Up The Good WorkHeyReplyCancel

  • Vicky - December 15, 2008 - 11:45 am

    The blonde in the pictures is so beautiful.
    And I’m not just saying that because she’s
    my God-daughter.
    The drummer is very cute too!ReplyCancel

Back to TopShare on FacebookTweet thisPinterest

The creation of this image began at the studio when a friend, Colin Foster attending the Hallmark Institute of Photography needed to get some shots for his final portfolio submission. Colin wanted to shoot a fight scene similar to many on the internet. I was concerned about copying the work of others but Colin explained that students often replicate poses and lighting setups as part of the learning process. Colin and I shot the same models in the boxing scene but we both added our own backgrounds. Here is Colin’s version

THE STUDIO
I got my daughters to come by for a few hours. The make up artist was Aimee Dorsey from Model Mayhem and her passion is gruesome-ness.

They were shot separately with both acting the part of being hit, then the hitter. Colin and I took turns shooting them.

D3, ISO 200, F13, 1/200sec.  24-70mm at 70mm

THE PIER
While on vacation in South Carolina I visited the pier in Garden City and felt it had many of the qualities I wanted for the fight scene. Lighting with depth, dark areas and great symmetry and perspective. This shot was taken about 5:30am during a time when only people fishing are allowed on the pier.

I set up on the empty pier and shot 5 images at 1EV spacing. I ended up blending in the single -1EV image with the HDR because Kara and Brooke were shot with a black background and a dark pier scene was needed to avoid problems blending the flying hair.

D3, ISO800, 0EV=F10, .6sec. 24-70mm at 48mm, tripod

TYLER and BECCA
Tyler and Becca modeled the next night on the pier to add to the fight scene. The job was for Tyler to look surprised as Becca alerted him to the fight. It was kind of a “hey look at that” moment. Notice that she’s pointing and grabbing his arm at about the same time he notices the action. I chose a specific spot based on the lighting, then during breaks in the crowd they would walk forward and strike their poses. The girl in the white skirt was fully visible in one of the shots so I included her in the final image.

D3, ISO 4000, F2.2, 1/60sec. handheld, 50mm (fixed)

FISHERMAN
The next night I walked the pier with my 50mm lens and even on a D3 it’s small enough to be stealth. I shot fishermen doing their thing on the pier. I was hoping to get someone bringing in a big one but that never happened. I left the pier about midnight. The fisherman’s bucket was white and I used Hue/saturation to colorize it close to the hand wraps.

D3, ISO 4000, F4.5, 1/13sec. handheld, 50mm (fixed)

The final image is a composite of 4 images for the people, 2 of fish plus the HDR image. Total of 11 images.

  • Mike Palmer - July 30, 2008 - 9:40 am

    FLAWLESS PERFECTION!!! Great work!ReplyCancel

  • oneshotbeyond - July 30, 2008 - 4:01 pm

    interesting concept here. Lovely HDR Processing and thanks for the details behind your shoot. What good sports the girls were-must have been a lot of fun!ReplyCancel

  • Jen - July 31, 2008 - 4:02 pm

    WOW! You blew me away with this one!

    1st of all – your daughters are beautiful (even with the bloody make-up). 🙂

    I know I’d like to sit with you to see the making of one of these in photoshop!! So impressive and pbviously it takes a lot of steps to get this final product which I so admire!
    I’m so happy you explain it all but I still think (even with my crazy love of HDR, etc) that I would have a hard time getting a photo to look like this.

    The part I kept re-reading and trying to understand was: “I ended up blending in the single -1EV image with the HDR because Kara and Brooke were shot with a black background and a dark pier scene was needed to avoid problems blending the flying hair.” I understand that you blended the -1EV image with the HDR you created but I’m still trying to understand how you got rid of the black background? Did you erase that part out of the layer? I ask because the whispy hair blowing is perfect over the pier background that you blended…

    I’ve done many multiple exposures (layering images) but there are overlaps I have issues sometimes. Would love to hear more details when you have time. 🙂

    Hi Jen,
    The basic rule of thumb when you intend to cut-out a subject and place them in a different scene is to shoot them in front of a background that is similar in brightness and color to the target background. The reason is that the pixels close to the edge of the subject blend into the background, it’s not a hard edge but a soft one. The background color actually becomes part of the subject very close to the edge. As a result, when you cut-out the subject, including shades of the background color is unavoidable. However in some cases you can cut out inside of the shaded area but a single hair is thin and doesn’t allow cutting inside. Remember, it’s not a hard edge but a gradation.

    It’s not uncommon to shoot the subject and not have the target background photographed or even visualized. In that case, I suggest shooting the subject in front of a variety of colors like black, white, 50% gray etc. When you finally get your target background you’ll have a variety of images to work with. Blending hair can be the most difficult so I tend to give that the highest priority when matching.

    To briefly state my cut-out method: First I do a rough cut-out close to the subject that always includes some of the background. Second: I drag the subject onto the target background and position it. Third: I move along the subject edge and look at how the target background and subject match. If they match then I erase on a mask with black close but not including the subject. If they don’t match I select inside of the subject, feather the selection then erase on the mask. This will create a blend from the target background to the subject. For example if the target background has blue in the area, the subject will also have a gradation of blue at the edge. It may only be a few pixels but it’s an important few pixels.

    I typically work on zoom levels from 300% – 500% which makes for a time consuming blend of the subject with the target background.

    Good Luck ReplyCancel

  • meleah rebeccah - August 3, 2008 - 10:45 am

    wow. I am impressed!!ReplyCancel

  • JRP - August 3, 2008 - 12:23 pm

    You’re so kind to write this up for me. After reading this it looks like I am on the right track with how I thought I should tackle something like this but you’ve given me quite a few pointers to look into to make cutting out easier. I definitely have to become better with masks and definitely need to get much closer to the subject with zooming in as you’ve mentioned when I erase.

    This is so well done. I need to try something like this soon and when & if I accomplish something even remotely close to what you have here I will certainly share the link.

    Thanks again Ferrell.

    Excellent work as always!ReplyCancel

  • jen rinaldi photography - August 3, 2008 - 12:26 pm

    oops…i left my last comment w/ the wrong email address. Just wanted to make sure you know it was me (which I’m sure you did). 🙂ReplyCancel

  • Vista - August 6, 2008 - 1:04 am

    You didn’t tell me you posted this. It’s so amazing! Its not just the cutouts and the perfectly blended images (ALL 11 OF THEM!!!), but the lighting is so amazingly perfect. The angles and where it falls. I love how the eye fills in the light at the lower right of the screen simply because of the repetition of the previous lights. Everything flows flawlessly. I like this version much better than Colin’s, simply because its much more believable. Amazing, not surprising. It must’ve taken hours! A well deserved, BRAVO! Oh, and the girls are gorgeous, both of them.ReplyCancel

  • meleah rebeccah - August 11, 2008 - 12:22 pm

    Ive added you to my blogroll. These are way too cool to pass up!ReplyCancel

  • Anna - August 4, 2011 - 3:25 am

    God damnit. This looks like a still from a movie. Way to go Ferrell. Once again.

    Gorgeous models.ReplyCancel

Back to TopShare on FacebookTweet thisPinterest

SeaStudios came to me for some images to use in a video they were producing. I had no idea who they were, until now. Sea Studios Foundation is dedicated to raising environmental literacy and motivating action in the US and internationally to address urgent threats to our planet’s health.

I don’t think many people would disagree with the fact that what we are doing to our earth is unsustainable – Tim Pawlenty, Govenor of Minnesota.

This high quality video production certainly raises awareness of our need to control climate change. Please watch this 14 minute video, your earth needs you to care. http://www.seastudios.org/ahead2_video_flash.php

The video is full of wonderful photography and video clips. Many images are HDR (see if you can pick them out) and I suspect many flickr users donated them.

I typically allow non-profit organizations to use my images at no charge, and for causes you believe in, I urge you to do the same. Your donated photography can be used to increase awareness and make a difference.

Here are my two images used in the video:

  • JRP - July 4, 2008 - 10:56 pm

    That’s so wonderful that your images were used for such a great cause!!

    The first one is an AMAZING image – so captivating! The driftwood in the foreground is perfect and draws your eyes to the water…and what an amazing colored sky…gorgeous!

    PS: Congrats your book being #1!!ReplyCancel

  • Barb - July 12, 2008 - 9:48 am

    They are both beautiful for different reasons, so I like them both equally.ReplyCancel

  • Barb - July 27, 2008 - 11:04 am

    Beautiful and stunning photos!ReplyCancel

  • meleah rebeccah - August 4, 2008 - 10:55 pm

    holy amazing colorReplyCancel

Back to TopShare on FacebookTweet thisPinterest