Hello everyone, I hope all is well. I’ve been absent for awhile, my dad passed away in November and this economy is so horrible I’m being careful about booking travel. But spring is around the corner and I look forward to emerging from hibernation.
Here is a recent shoot that I finished and I wanted to share my approach to getting the final image. I hope you enjoy.
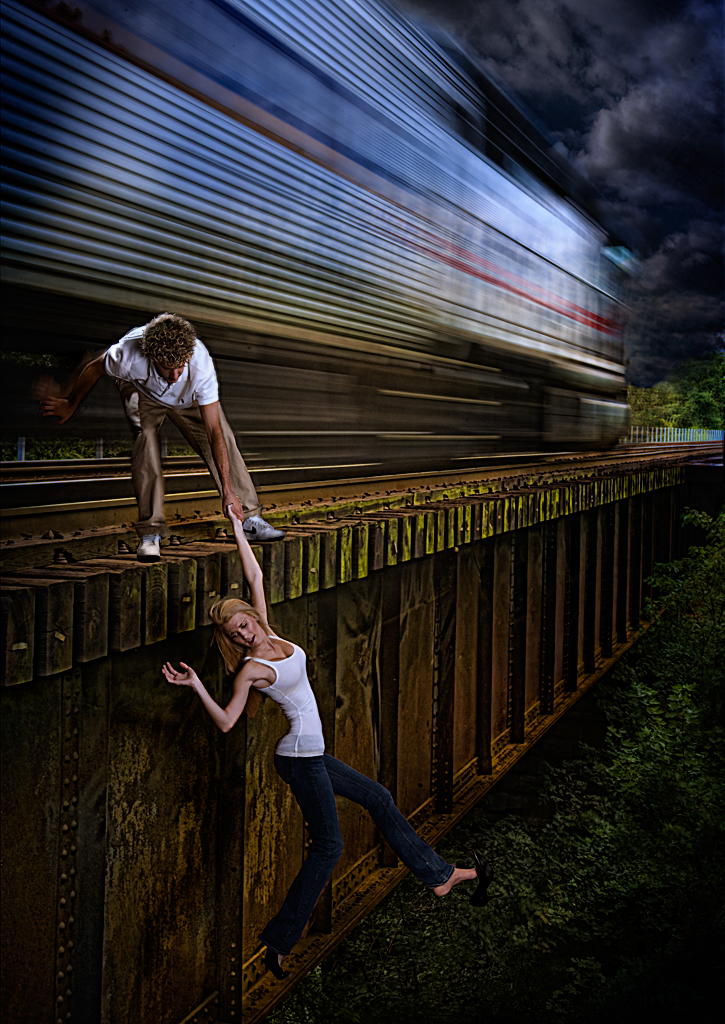
UPDATE: The image you see now is updated from the original. I moved the guy closer to the edge, his right foot is now in front of the beam, I added some blur effects along his arm, leg and hair for added drama. I trimmed a little off the front corner of the train to make it narrower.

The Concept
When a band contacted me for their new CD cover they only knew they wanted to title the CD “Take the High Road.” Ideas started stirring, and after some brain storming we settled on a theme “a guy saving a girl falling off a building or a bridge.” I visualized the guy holding her by one arm in an industrial setting, lots of steel with a dark gloomy mood.
The Search
I went with the idea of a girl falling off a bridge and began a local search for a highway bridge with big I-beam supports. I used local maps to scout for bridges that might fit the theme and I drove to each one and sized it up as a potential subject. I didn’t find what I was looking for and decided to try railroad bridges. The one I picked spanned a large river and had some rusty I-beams.
The Railroad Bridge
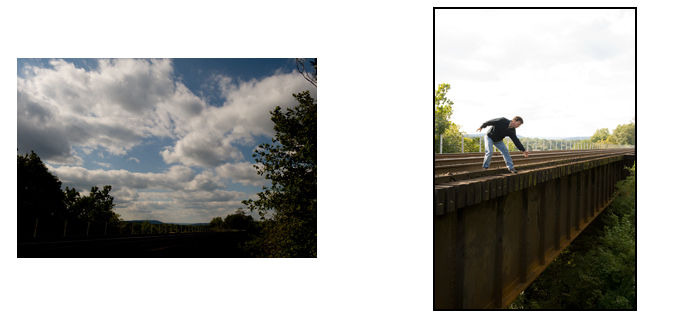
I had to walk a mile to the bridge and as I arrived a train whisked past and sparked a new idea. If I could shoot the scene with the train going past it would create a sense of urgency and provide the one element I always love in a shot – motion. I set up and took some HDR image sets, some cloud compositions and a pic of myself to scale the models into the scene later.

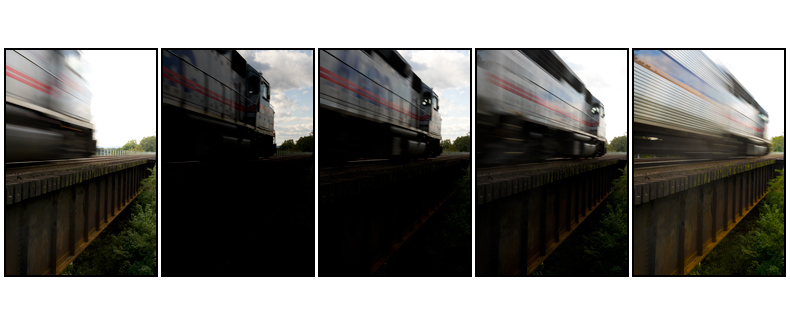
After a couple hours a train came rumbling past and with camera on tripod and ready to go, I shot 5 images @ 1EV spacing. The camera was set on continuous shooting so the 5 images were done in rapid fire. Here you can see the order of the images 0EV, -2EV, -1EV, +1EV, +2EV.

The Models
I found Chelsea and Kevin on Model Mayhem and they were very interested in doing the mock up shoot at the studio. The big challenge was to get Kevin elevated enough so Chelsea could hang with her arm extended and not touch the floor. I estimated he would need to be 9 feet off the floor. I also wanted to support Chelsea’s weight so Kevin wasn’t exhausted after 5 shots and he wouldn’t get pulled off the platform. Chelsea has her left bum on a high stool (behind the sheet).
The Set
When you are adding people to a scene it’s easier to place the colors behind them that approximate the scene colors. This is essential when the person has wispy hair and you want to avoid that cut-out look. Also, keep in mind, the tonality of the studio scene behind the model can transfer or wrap around their skin and clothing. For this set I attached fabric that approximated the color scheme of the railroad picture.
Here are few shots taken during the session. There were two flash setups, one for him and one for her. He was lit from above and slightly behind to simulate light reflecting off the train and then from his left front. She was lit with a softbox to her right and a beauty dish to her front and directed toward her face. That would allow some dropoff of light along her legs and simulate the darkening valley below the bridge.

Processing
As a photographer you want all the tools at your disposal and it’s important to learn which tools are needed to achieve the qualities in the final image you are seeking. With all images from the train shoot I tried a variety of approaches from full on HDR to single image tone mapping to adding tonal contrast in PS or Nik Color Efex. In time you’ll be able to stand behind the camera and realize the type of processing as you view the scene.
For the train scene I prepared the HDR image and single tone mapped images. I got the best results from tone mapping the +2EV single image and adding the sky in a separate layer. I used the Nik filter midnight to darken the image then a mask to brush the darkness selectively.
That about covers this shooting project. Thanks for dropping by.

.jpg)
You continue to amaze me. The effort that you put into this was so worth it!
Absolutely fantastic final shot – I appreciate the way that you share the details of the set up and the how to.
Absolutely fantastic!
Greetings!
Where’s the guy’s right foot/shoe?
See Update
Nice effect, but some niggles:
– there is some fringing on the inside of the guy’s right pant leg, left by the ochre studio backdrop; perhaps blue/green chroma keying would have worked better?
– wouldn’t you expect to see the effect of a train rushing by in the guy’s hair and clothes?
– the way he is sticking his right hand across the tracks, it would get ripped off by the train.
Hi Roy,
Thank you. I don’t recall any fringing but I’ll check out the full-res version to make sure. I was pretty careful about avoiding fringing. WIND, actually when I did the shoot there was a large fan on high to my left. I brought it as close as possible and out of view. You might notice some of her hair is blowing in the last outtake. The dude had some tight ringlet hairstyle and the fan would move it. Had I to do it over I’d use some clips and/or string to pull the clothing to mimic the wind. Regarding the arm, there is actually lots of room between him and the train. I sized that when I did the self port shot. FM
Good to “see you” on Blog again – and thanks for the explanation of all it takes to get the shot you want – the Art of it All. Fascinating, and my favorite part is the relationship shown by the motion.
Thanks for responding. I blew up part of the image to demonstrate the fringing:
http://img.skitch.com/20090209-jj6isp88t617g7a6shyacu9561.jpg
Kudos on having the presence of mind to use a fan in the studio shot. I would just expect to see more of an effect on the guy’s clothes when a train is rushing by at that speed and proximity.
But I’m really just nitpicking here; this is a very strong image. I’m not sure what impresses me more, your photographic and retouching skills, or the girl’s waist size. 😉
Thank You – See UPDATE
Good to see Before the Coffee back in form- Great concept and execution!!
Welcome back. I have your site set as a favorite and used to check it each day. My wife bought me your book for Christmas, excellent, I’d recomend that to everyone interested in HDR. Sorry to hear about your loss but good to see you return, I’ll start checking your site again.
Ferrell,
There is a new forum devoted to HDR: http://www.strictlyhdr.com/forum.htm
Your name is being bandied about there, thought you might like to check it out.
Hey man!
Real nice project!!
Loved the final result!
Keep on posting these projects!
Thanks for the detailed background Ferrell, some beautiful results and many ideas to contemplate!
Cheers,
John
Just dropping by.Btw, you website have great content!
______________________________
Why this one-minute therapy is being suppressed in the U.S. while more than 15,000 European doctors have been using it to heal millions of patients
Just bought your HDR book. I was disappointed with the HDRs I’ve tried, but a quick leaf through the book helped me see what I was doing wrong. I’m looking forward to doing some serious reading this weekend!
It’s really great to see how you achieved these effects. A great motivator to try things for myself. Thanks so much.